

Applications
An application is one of your code repositories, together with everything Productmind needs to run it: the install and run commands, the services it starts and their ports, and its environment variables. You import applications from your Git provider or start one from a template, and Productmind scans each one to fill in its configuration, document it and find the features it implements.
Key concepts
Application. One repository and how to run it. Every application has an ID such as APP-3, numbered within your workspace. A repository becomes one application, even when it holds several services.
Type. What kind of software the application is: Web service, Monorepo, CLI, Worker, Mobile app, Library / SDK, Desktop app, Infrastructure, Docs site or Other. Only a Web service, a Monorepo that contains one, or an application with no type yet can run a live preview.
Service. Something that runs inside the repository, such as a web front end, an API or a worker. A service that serves a browser gets a port, and that port is what a live preview opens. A library, a worker or a CLI has no port. When the service architecture is mapped, each service of a repository that holds several also appears on the architecture map, with the folder its code lives in, and features are linked to the services they live in. See Features.
Branches. Each application names three branches of its repository, and one for each environment your workspace adds:
| Branch | Used for |
|---|---|
| Base | The branch coding sessions start their work from, and open their pull requests against. |
| Development | Your common development stream. Releases compare it with the production branch. |
| Production | The branch you deliver to production. |
| One of your environments, such as Staging | The branch that environment deploys from. |
An environment that deploys to a cloud account keeps its branch: change it under Cloud accounts instead. See Cloud accounts.
Scan. An AI agent that reads an application's repository and reports what it finds. Scans only read your code: they never change it, commit or open pull requests.
Sandbox. Applications run inside a sandbox. A coding session gets an application's code when the application is attached to the session's sandbox, or when the tasks or bug reports the session works on belong to the application or to one of its features. See Sandboxes.
The Applications page at a glance
In the sidebar, under Engineering, choose Applications.
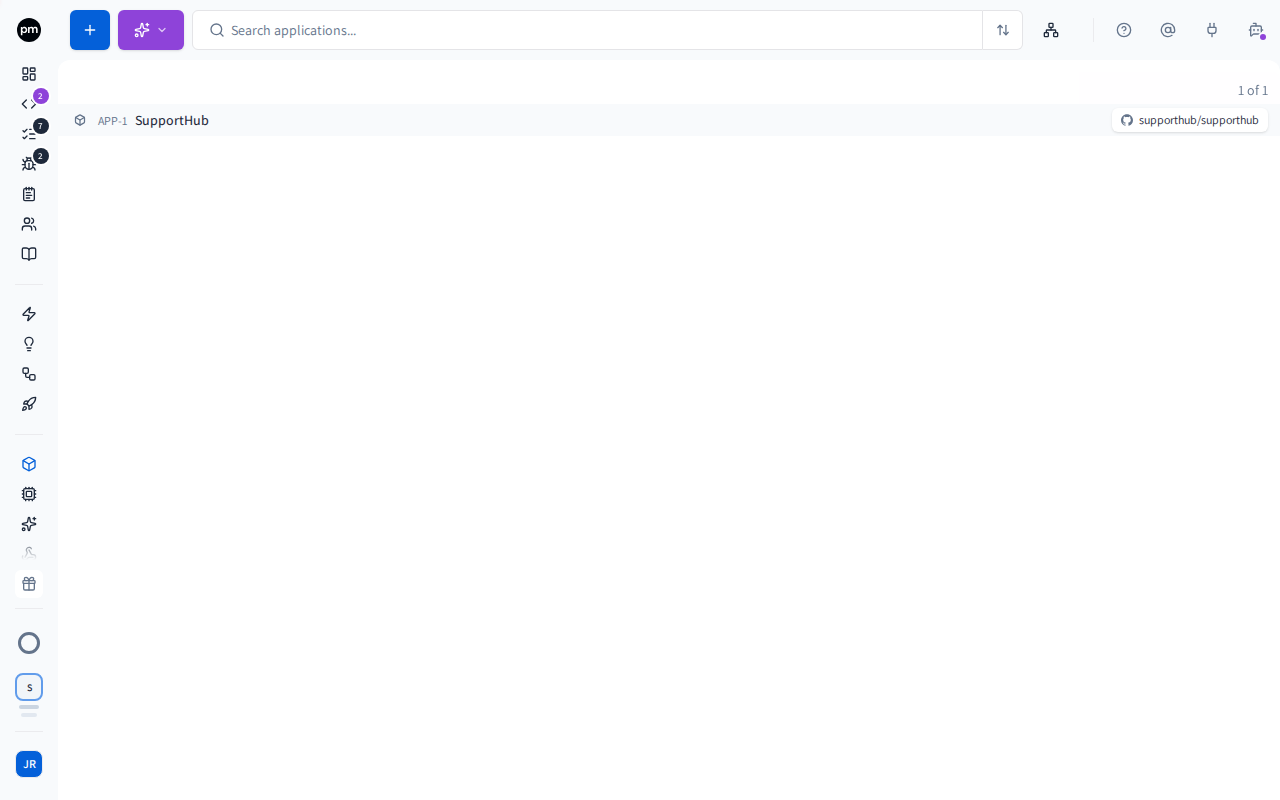
The toolbar holds, from left to right:
- Add application (the + button), which imports applications from your repositories or starts one from a template;
- Scan applications, a menu of the scans that run across all your applications;
- the search box, which matches names, descriptions and repository names;
- Sort, by Name or Created;
- Architecture map, which shows how your applications depend on each other.
Each row shows the application's type, its ID and name, and its repository. While a scan runs, an orange status icon appears before the repository; point at the row to see which scan. Choose a row to open the application beside the list.
To delete several applications at once, select them with the checkboxes that appear when you point at a row, choose Delete selected, enter delete, and choose Delete. Right-clicking a row offers Open in new tab and Delete.
Importing applications
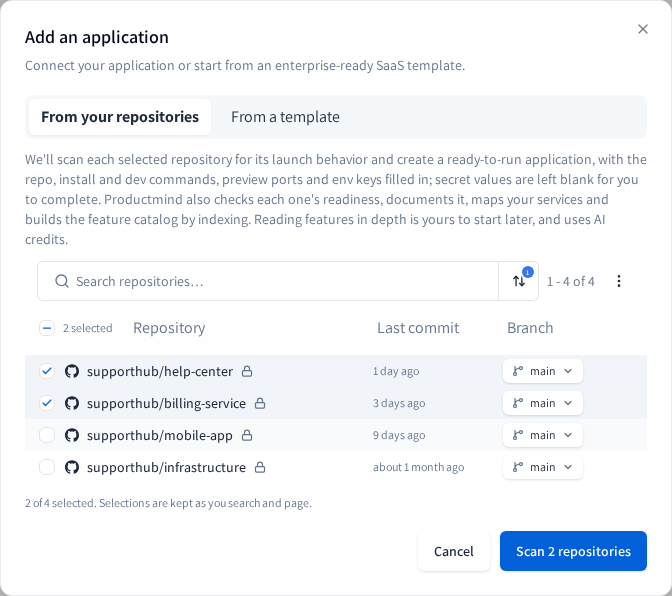
The Add an application dialog opens on the tab that matches how you chose to start when you set up your workspace: From a template if you chose to build a new application, From your repositories otherwise. Switch tabs at any time. With no applications yet, the list offers both: choose Start from a template or import one of your repositories.
To import applications from your repositories
- In the sidebar, choose Applications.
- Choose Add application (the + button), then From your repositories if the Add an application dialog didn't open on it.
- Select the repositories to import. Only repositories that aren't an application yet are listed. You can search, sort by name or last commit, and page through them. Your selection is kept while you search and page.
- Optionally, pick the Branch to scan for each repository. It starts on your workspace's development branch if the repository has one, otherwise on the repository's default branch.
- Choose Scan N repositories.
Productmind scans each repository and creates an application from it, with its repository, install and run commands, services and ports, and the names of its environment variables already filled in. Secret values are left blank for you to complete. A strip above the list shows Detecting applications and how many repositories are done. Each new application appears in the list as soon as its repository is done.
If no repositories are listed, connect your Git provider first. The dialog offers the providers you can connect, or see Integrations.
To start an application from a template
A template is a working codebase that Productmind maintains, with its documentation and feature specifications. Starting from one gives you your own copy of all three. Productmind's SaaS template, for example, is a working multi-tenant web application: organizations and workspaces, users, roles and teams, sign-in with single sign-on and two-factor authentication, billing and an audit log are already built and tested. In full, it includes:
- Organizations and workspaces, with each organization's data kept apart from every other's: depending on its plan, in a database schema its workspaces share, a schema for each workspace, or a database of its own.
- Users, roles and teams, with invitations and permissions that decide what each person can see and do. The server checks each permission, and the app hides what a person can't use.
- Sign-in with a password, a one-time email code or a Google account, and single sign-on over SAML or OIDC for each organization, which it can require of its members. A password change signs the account out everywhere else.
- Two-factor authentication with an authenticator app and recovery codes, which an organization can require of everyone in it.
- Billing through Stripe or Mollie: flat or per-seat plans, checkout, prorated plan changes, seats that follow the members, discount codes and invoices. A plan can turn parts of the application on or off, and a payment whose confirmation never arrived is still settled.
- An audit log of the changes made to your data, and who made them. Each field of an audited record is either logged or deliberately left out: a new field that is neither fails the build.
- Suspension and deletion: a platform admin can suspend an organization, or delete it after a grace period.
- Notifications, already wired to the rest of the application.
- A deployment to AWS, which an environment uses when it deploys to a cloud account.
- An end-to-end test suite, which an AI coding assistant can also use to drive the running application.
It is written for coding agents too. Its repository has instructions for AI coding assistants, for the whole repository and for each of its parts, and a style guide that shows the application's real components. Its feature specifications come with their business rules, so a coding session on your copy starts from what the application already does.
- Choose Add application (the + button), then From a template if the dialog didn't open on it.
- Choose a template to see it on its own.
- Choose Create application.
- Wait while Productmind sets it up. Copying the repository can take a minute, and the dialog stays open until it's done.
The new application opens, with its documentation and feature specifications already in your workspace. Productmind hosts your copy as a private repository in its own GitHub organization, so coding sessions, previews and pull requests work on it straight away. A very large template is copied in part: a message then says how many of its feature specifications or documents came across.
The copied feature specifications don't count toward your plan's Features per workspace limit, so a template doesn't use up the features you can add yourself. See Plans and limits.
If your connection drops while the copy is being made, Productmind checks whether the application was created before it offers Try again, so you don't end up with two copies. A copy of the same template within a few minutes of the last one is refused for the same reason: open the first one from Applications.
If the tab says No templates available yet, Productmind hasn't published templates for your plan. Import one of your own repositories instead.
To work on a template's repository outside Productmind
Adding your own GitHub account to a template's repository is available only when Productmind has turned it on for your organization. Otherwise, work on the repository through coding sessions, previews and pull requests in Productmind: nothing in Productmind depends on direct access.
When it is on for your organization:
- Open the application and choose Source code.
- Beside the repository, choose Add me as a collaborator. If you haven't connected your own GitHub account yet, the button reads Connect GitHub and add me as a collaborator: it connects your account first, then sends the invitation.
- Accept the invitation that GitHub sends you.
You get admin access to that one repository, so you can clone it and push to it directly.
To move a template's repository to your own GitHub organization
The code in your copy is yours. Before you delete the application, its workspace or your organization, email legal@productmind.ai and ask Productmind to transfer the repository to a GitHub organization your company controls, or to send you a copy of it.
Working with an application
Choose an application in the list to open it.
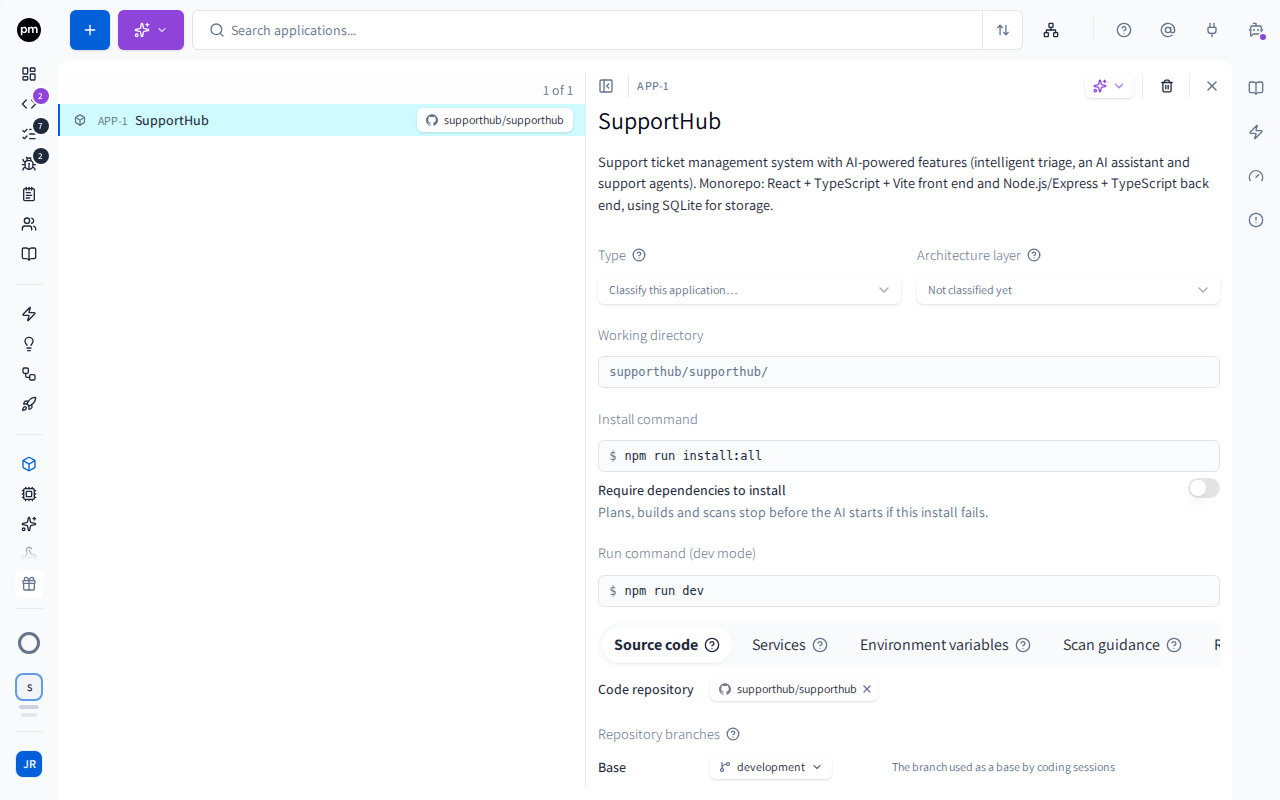
The header holds the type and ID, Scan application, Delete application, Close and the name. Under it, a menu on the left opens each part (only icons on a narrow page: point at one).
Overview shows:
- the description. When you attach a repository, its README is offered as the description;
- Type and Architecture layer (Frontend, Backend, Data or External), which places the application on the architecture map;
- Working directory, the folder inside the repository the commands run from. Leave it empty for the repository's root;
- Install command, with Require dependencies to install under it, and Run command (dev mode).
Run, Agents and Knowledge hold the rest:
| Item | Holds |
|---|---|
| Source code | The Code repository, the Base, Development and Production branches, the branch of each of your environments, Read-only, and, for a repository Productmind hosts, the Cloud accounts its environments deploy to |
| Services | What runs inside the repository, with each service's type, port and protocol |
| Environment variables | The variables the application's processes get |
| Scan guidance | Notes that tell the scans what the folder layout doesn't |
| Risk rules | The rules that decide which changed files a pull request review flags as high or medium risk, and which it never flags: see Risk rules |
| Knowledge Base sync | The branch and the folders or files whose Markdown docs are synced into the knowledge base, in early access: see Knowledge Base sync |
Insights holds:
- Documentation, the knowledge base pages that document the application;
- Features, the features the application implements;
- Readiness, the latest agentic readiness report;
- Coding errors, where its coding sessions went wrong, for the workspace's managers. See Coding errors.
A dot beside each scanned one shows its scan's state.
Changes save automatically.
To change how an application runs
- Open the application.
- Enter the Working directory, Install command and Run command (dev mode).
Coding sessions and live previews install the application with the install command and start it with the run command, both from the working directory. Scans that map your features run the install command too, so that the code can be read with its dependencies in place.
The working directory, the commands, the ports and the environment variables all need a repository. Until one is attached, they can't be edited.
To require the dependencies to install
- Open the application, and enter an Install command if it has none.
- Turn on Require dependencies to install.
A plan, a build or a scan of the application then stops before the AI starts when its install fails, takes over 10 minutes or can't run, and says why. Plans install it too. Off, a run carries on without the dependencies, with a warning. Clearing the install command turns it off.
To add a service and its port
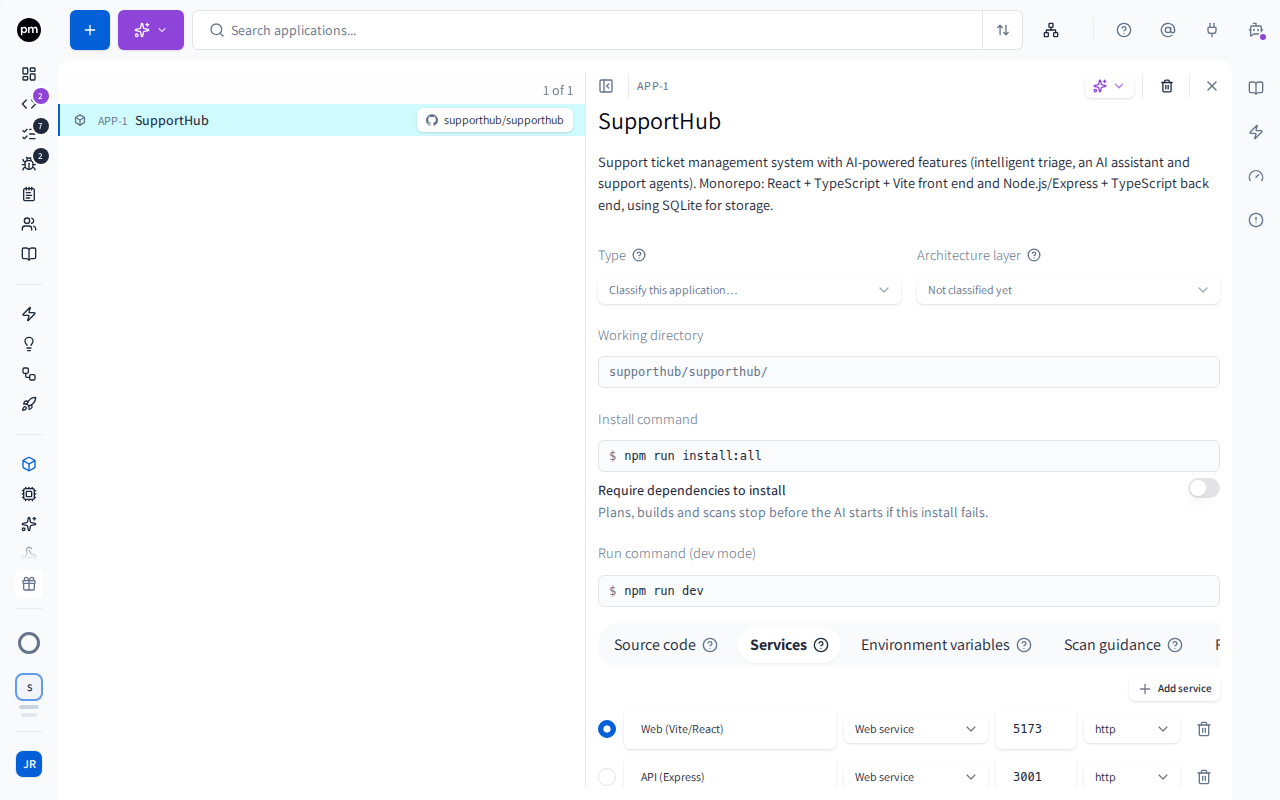
- Open the application and choose Services.
- Choose Add service (the +).
- Enter the service's name and choose its type.
- If the service serves a browser, enter its port, and choose https if its development server serves TLS. Otherwise leave the port empty.
- If several services have a port, select the radio button of the service the preview should open on.
To remove a service, choose Remove service (the trash icon) on its row.
The application shows Live preview not available until it has a Run command (dev mode) and a service with a port. A preview can still start without a port: it then opens port 80.
To set environment variables
- Open the application and choose Environment variables.
- Choose Add variable (the +), and enter the key and the value.
- For a password, a token or any other secret, turn on Secret.
To remove a variable, choose Remove variable (the trash icon).
A secret's value is hidden once saved, and shows as (set). A value can include
{sessionId}, {workspaceId} and {previewBaseUrl}, which are filled in for each session when
its container starts, for example {previewBaseUrl}/{sessionId}/5000.
To install from a private package registry
If some of the application's packages come from a private registry, for example an npm scope on GitLab or GitHub Packages, its install needs a token:
-
Open the application and choose Environment variables.
-
Add the token as a variable, for example
NPM_TOKEN, and turn on Secret. -
Make the Install command use it. For npm:
Code
Coding sessions, live previews and scans all run the install command with the application's environment variables and its sandbox's, so a token set on either covers all three. A scan gives them to the install command only.
To change the repository or its branches
- Open the application and choose Source code.
- To change a branch, choose it and pick another one. A default tag means the Development or Production branch comes from your workspace's Git workflow settings. Pick a branch to override it for this application, or choose Use workspace default to go back to the workspace's branch.
- To replace the repository, choose Remove repository (the x on the repository), then Select repository and pick another one.
When you attach a repository, Productmind offers its README as the description. An empty description is filled in straight away. Otherwise it asks before it replaces yours.
A repository that Productmind hosts for a template can't be removed or replaced: it stays with its application, and only its branches can be changed. To stop using it, delete the application.
To make the repository read-only
- Open the application and choose Source code.
- Turn on Read-only.
Coding sessions then read the repository for context and never push to it or open pull requests on it, including the sessions already open. Its branch rules are not checked for them either. A session can't undo it: turn Read-only off here to let sessions push again. See Read-only repositories.
To map a branch to an environment
- Open the application and choose Source code. Each environment your workspace added is listed under Production, with Not mapped until it has a branch.
- Choose the environment's branch and pick one. Branch mapped appears.
- To unmap it, choose the x next to the branch.
Merges into the branch then record deployments to that environment, and coding sessions don't work on it. Changing or removing the repository unmaps every environment. To add an environment, see Environments.
To guide the scans
- Open the application and choose Scan guidance.
- Enter what the scans should know that the folder layout doesn't tell them. For example, which folder is the leading implementation, or which code is being replaced.
Every later scan of this application reads your notes, and they override what the folder layout suggests.
To link features and documentation
- Open the application and choose Features or Documentation in its menu.
- Choose Link features or Link documents (the +), and pick what to link.
To unlink a feature, choose Unlink feature on its row. Scans also link the features and the documentation they find. A feature's link to an application also holds the feature's code surface there: the files and entry points that implement it. See Code surface.
To sync documentation from the repository
An application can sync the Markdown docs in its repository into the knowledge base, as read-only documents that each push to the branch updates (early access). See Knowledge Base sync.
To delete an application
- Open the application and choose Delete application (the trash icon).
- Enter the application's name, and choose Delete.
Deleting an application also deletes the tasks created under it, with their subtasks, comments and attachments, its components on the architecture map, its scan history and its links to features. Its knowledge base documents are kept, but unlinked. The application is removed from every sandbox. It can't be undone.
You can't delete an application that is part of a release. Remove it from those releases first.
Scanning your applications
There are two kinds of scan: the ones that read one application, and the ones that read all your applications together.
Scans of one application
Choose Scan application in an application's header to see its three scans:
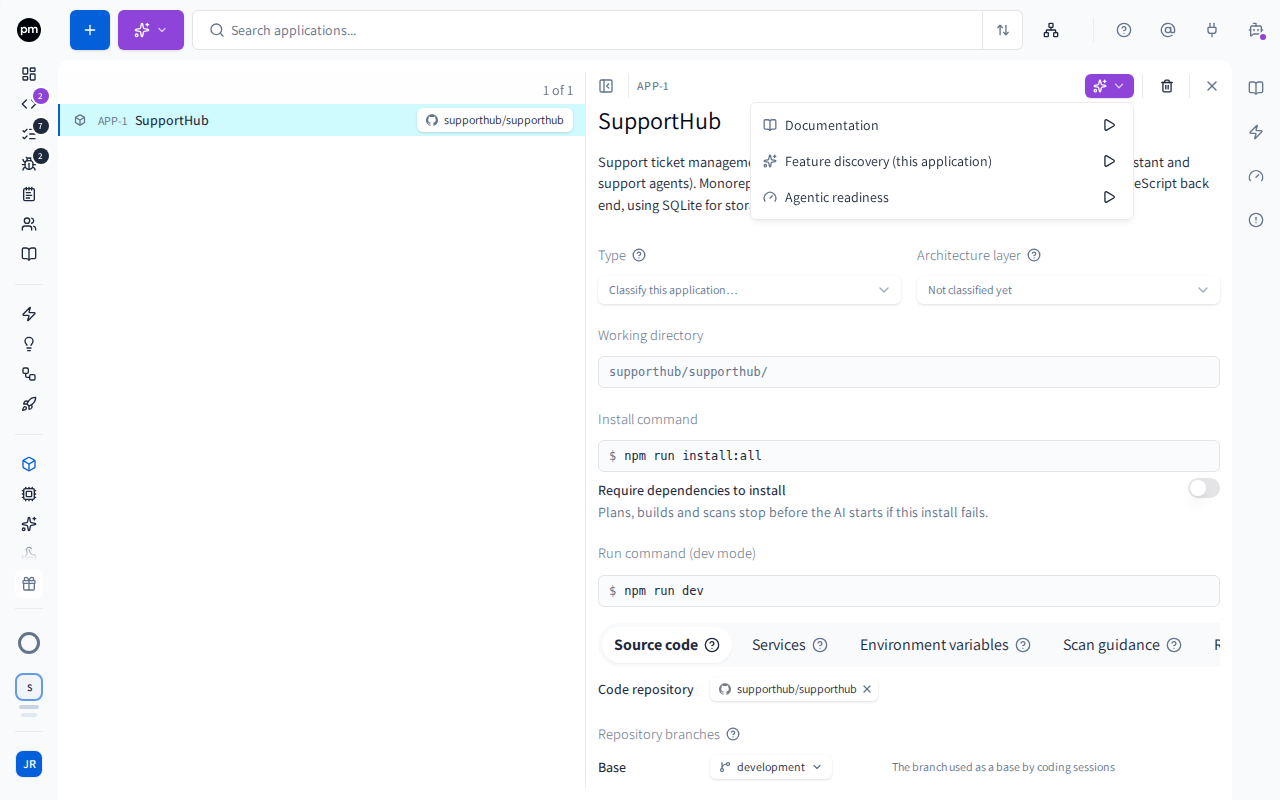
| Scan | What it does |
|---|---|
| Documentation | Writes and updates the application's technical documentation in your knowledge base. New pages are created directly. Changes to existing pages are proposed for you to review. |
| Feature discovery (this application) | Runs Feature discovery on this application only: draft features in a workspace with none, otherwise proposed changes to review. To scan all your applications together, use Feature discovery under Scan applications. |
| Agentic readiness | Rates how well the repository is set up for AI coding agents. |
The readiness report rates the repository Highly optimized, Needs improvements or Not optimized, with a score out of 100 and a summary. Its findings mark each area pass, warn or fail, with a recommendation: CLAUDE.md, AGENTS.md, Agent skills, Folder scaffolding, Documentation freshness and AI tool optimization. Optimized for lists the AI tools the repository is set up for.
To run a scan on one application
- Open the application and choose Scan application.
- Choose the run button (the play icon) at the end of the scan's row.
- For Feature discovery (this application), optionally add documents with your naming rules, then choose Run feature discovery (Re-scan once you have a catalog).
The row shows the scan as running, as does the application's row in the list. To stop it, point at the spinner on the scan's row and choose Stop. When the scan finishes, its results appear in Insights. Up to date means the scan found nothing to change, and Failed shows the reason when you point at it. The same button then rescans, or retries a failed scan.
Documentation, Features and Readiness under Insights have the same controls. When a re-scan's changes wait for review, the Features view shows them, and Review changes opens the review, a page under Features.
Feature discovery (this application) needs Features: Create. Only one Feature discovery runs at a time in a workspace, so this row also shows one started elsewhere as running.
Scans across all applications
Scan applications in the toolbar runs a scan across every application that has a repository:
| Scan | What it does |
|---|---|
| Service architecture | Reads all your repositories together to find which service depends on which, including across repositories. It draws the architecture map. |
| Feature discovery | Indexes all your repositories together and builds your feature catalog, in your business's language, with the applications each feature spans. If indexing can't build a catalog from your code, the row shows Not indexed and offers Read the code with AI next to the retry button. See Features. |
| Agentic readiness | Runs the readiness check on each application. |
| Documentation | Runs the documentation scan on each application. |
Feature discovery can't start while the service architecture is being mapped, because it catalogs features against that map. How the catalog is shaped is set under Feature discovery.
Only the person who started Feature discovery, or someone who manages the workspace, can stop it. For anyone else, its row shows the scan running without a stop, and pointing at the spinner says who started it. See Features.
To run feature discovery on some of your applications
- In the list, select the applications with the checkboxes that appear when you point at a row.
- Choose Scan applications. The Feature discovery row shows how many applications it will scan, for example Feature discovery (4). Applications without a repository aren't counted.
- Choose the run button (the play icon) at the end of the Feature discovery row.
- Optionally add knowledge-base documents with your naming rules, then choose Run feature discovery, or Re-scan when your workspace already has a catalog.
Only the repositories of the selected applications are read, and the features already in your catalog are kept. A re-scan of some applications proposes changes only for features whose code is entirely in them, for you to review: see Re-scans and naming rules. With nothing selected, Feature discovery scans every application that has a repository. Service architecture, Agentic readiness and Documentation always run across all your applications.
A scan your balance can't cover is greyed out. When you open Scan applications, each scan is checked against your Pay-as-you-go balance. A scan that needs more than the balance holds is greyed out, and pointing at it says what it needs. The top of the menu then offers the fix: Top up (with the amount filled in), Activate pay-as-you-go, or turning spending back on. A scan that is refused, from this menu or from an application's own Scan application menu, starts nothing, so no failed scan is left behind.
What a scan costs
A scan runs AI agents, so it uses AI credits, which your plan charges from your Pay-as-you-go balance. Importing repositories runs a scan of each repository, then maps the service architecture and builds the feature catalog. What that costs depends mostly on how many repositories you import: each repository adds its own part, and the service architecture and the feature catalog are added once.
Productmind estimates the cost before the scan starts, as a range from a typical scan to a larger one.
The scan starts only when your balance covers the lower end of the range. Otherwise Scan N repositories is refused, and Productmind shows the reason with its remedy, such as "Your Pay-as-you-go balance is EUR 4.57, and this scan needs at least EUR 6.24 available. Top up to continue." and a Top up action, which opens the top-up dialog with the amount that covers it already entered. Top up, then scan again. The estimate is a check, not a hold: other work can draw on the same balance while the scan runs.
A scan on your own machine uses no AI credits. While your Productmind agent is online, the scan runs there. If your plan charges for sessions on your own machine, each scan session pays your plan's per-session price instead: the estimate then shows that price for every session the scan starts (one per repository, plus one for the service architecture and one for the feature catalog), and the scan starts only when your balance covers it.
Scans you start one at a time, such as a deep read of a feature or reading the code with AI, are checked like any other coding work before each one starts. See What deep reads cost.
If a scan pauses
If your balance runs out between the steps of an import, for example after your repositories are scanned but before the service architecture is mapped, the next step waits instead of failing. The Architecture map, the feature map on Features and the setup steps show Paused: top up to continue, with the reason.
- The scan continues by itself once a top-up has settled.
- Top up opens the top-up dialog, for an Owner or Admin. Before your organization's first top-up, it reads Activate pay-as-you-go.
- Resume starts the paused step again by hand, for example after an Owner or Admin turned pay-as-you-go spending back on. If the balance still doesn't cover it, the step stays paused and Productmind says why.
- To give up on the paused step, stop it as you would a running scan.
To view the architecture map
- Choose Architecture map in the toolbar.
- To draw or redraw it, choose Map service architecture (or Re-map service architecture).
The map shows each application in a column for its architecture layer, with lines for the dependencies between them. An application that has no layer yet appears in the Unclassified column at the end of the map, and one that has no type yet is labeled Unclassified. Mapping the service architecture sets the layer of each application it scans, and you can set Type and Architecture layer on the application yourself. If you change an application's layer yourself, later scans keep your choice.
A repository that holds several services shows each of them as its own node, with the folder its code lives in and how many features it implements: the features whose code sits in that folder, and the features someone linked to the service by hand. Choose a service to list its features, each marked by folder or by hand, and choose one to open it.
Folders are recorded when the service architecture is mapped. If your map was drawn before Productmind recorded them, its services show no folder and match no features by folder: choose Re-map service architecture to fill them in. A service that isn't one folder keeps none, and still lists the features linked to it by hand.
How applications behave
Importing runs the setup scans for you. Each imported repository is set up and then, in the same scan, checked for agentic readiness and documented. When every repository in the import is done, Productmind maps the service architecture and then builds the feature catalog by indexing your code (as proposed changes when the workspace already has features). Nothing reads your features in depth until you start it: deep reads, composing a feature from its components, and reading the code with AI when indexing falls short are all yours to start, from Features, and each one uses AI credits.
Importing doesn't attach an application to a sandbox. To give every coding session an application's code, attach it to a sandbox, usually your default one. See Sandboxes.
Scans count toward your usage. Each scan runs an AI agent, and the AI credits it uses count toward your plan's AI credits, like coding sessions and every other AI task, at the same price. The Usage tab counts them under Coding. See What a scan costs and Usage.
A scan your Productmind agent runs is a user-hosted session. While your Productmind agent is online, a scan can run on your machine instead of in Productmind's cloud. It then uses none of your AI credits, and if your plan charges for sessions on your own machine, it is charged your plan's per-session rate once. Every scan run is a session of its own: an import of N repositories runs about N + 2 scan sessions (one per repository, then the service architecture and the feature catalog). Deep reads, compositions and the AI reading pass are further sessions that you start, one per run: a feature made of components is read in runs of up to four of its components. See What deep reads cost.
Scans in Productmind's cloud run on runners of their own. Each scan session runs on a runner that serves only that session, never another session or another organization. A workspace runs up to five of them at a time, and the rest wait their turn. A scan step that gets no runner within six hours stops, and the scan shows No runner became available for this scan step in time. Try the scan again.
One scan of each kind at a time. A scan that is already running on an application can't be started again until it finishes or you stop it.
Changes appear live. Scan progress, new applications and scan results update without a refresh.
Permissions
| To | You need |
|---|---|
| Open an application | Applications: Read |
| Import applications, or start one from a template | Applications: Create |
| Change an application, map its branches to environments, run its scans, or invite yourself to a template's repository | Applications: Update |
| Run Agentic readiness or Documentation across all applications | Applications: Update |
| Delete applications | Applications: Delete |
| Map the service architecture | Applications: Create |
| Resume a paused scan | Applications: Create |
| Top up the Pay-as-you-go balance for a scan | The Owner or Admin role |
| Run feature discovery across all applications | Features: Create |
| Stop feature discovery someone else started | To manage the workspace, and Features: Create |
| See an application's Features view | Features: Read |
| See the features a service implements, on the architecture map | Applications: Read and Features: Read |
| See an application's Documentation view | Knowledge base: Read |
The Owner and Admin roles can do all of these. Power User can do all of them except topping up the Pay-as-you-go balance. Developer and Product Manager can open applications but not change them, so Applications isn't in their menu: they reach an application from the features, sessions and bug reports it's linked to. Viewer and Customer can't see applications. See Roles and permissions.
Limits
| Limit | Value |
|---|---|
| Repositories in one import | 50 |
| Repositories in one service architecture or feature discovery scan | 60 |
| Services per application | 50, of which 20 can have a port |
| Environment variables per application | 100 |
| Scan guidance | 4,000 characters |
Troubleshooting
Applications is missing from my menu
You need permission to change applications (Applications: Update). By default the Owner, Admin and Power User roles have it, and Developer and Product Manager can only open applications. Ask an Owner or Admin of your organization.
No repositories appear in the import dialog
Either no Git provider is connected, or every repository you can reach is already an application. The dialog says All repositories are already applications in the second case. Connect another provider under Integrations.
Too many repositories selected
An import takes at most 50 repositories. Deselect some, and import the rest in a second batch.
A repository didn't become an application
When some repositories in an import produce no application, the strip above the list says Scanned N repositories and gives the reason for each one. Fix the cause, and import the repository again. Choose the x to dismiss the summary.
The scan buttons are disabled
Every scan needs a repository. Attach one in Source code. In the Scan applications menu, No applications with a repository to scan means none of your applications has one, and None of the selected applications has a repository to scan means none of the applications you selected has one: select others, or clear the selection to scan all of them. A scan greyed out with a sentence about your Pay-as-you-go balance needs more than the balance holds right now: use the action at the top of the menu, and the scan can start once the balance covers it.
A scan won't start because of a usage limit or your balance
Scans use your plan's AI credits, like coding sessions. When your organization has used up its AI credits for the month, week or day, a new scan is refused like any other coding work. On a plan that charges scans from your Pay-as-you-go balance, a scan that the balance doesn't cover is refused with a message that says what your balance holds and what the scan needs ("Your Pay-as-you-go balance is EUR 4.57, and this scan needs at least EUR 6.24 available. Top up to continue."); before pay-as-you-go is activated, with "Activate pay-as-you-go to keep going". A scan that would run on your machine is refused the same way when your plan leaves out, or has used up, User-hosted sessions, or when its per-session fee can't be paid. See Plans and limits for what you can do.
A scan says "Paused: top up to continue"
Your balance ran out between the scan's steps. Top up, and the scan continues by itself. If pay-as-you-go spending is paused, an Owner or Admin turns it back on under Billing & Payments > Usage, and then you choose Resume. See If a scan pauses.
A scan says "No runner became available for this scan step in time"
Productmind's cloud had no runner free for that step of the scan within six hours. Start the scan again. The message reads "A runner could not be started for this scan step" when a runner failed to start, and "The runner for this scan step stopped again" when the step's runner stopped twice: start the scan again in both cases.
Live preview not available
The application's type can't run a preview, or it has no run command or no service with a port. The message says whether it's the type. Set the type, the Run command (dev mode) and a port in Services.
A coding session has none of my code
The application isn't attached to the session's sandbox, and the session's tasks don't belong to it or to one of its features. Attach the application to the sandbox, or link the task's feature to the application. See Sandboxes.