

Signing up and signing in
You get into Productmind in one of two ways: someone invites you to their organization, or you start an organization of your own. After that you sign in with your email and password, with Google, or through your company's single sign-on.
Key concepts
Account. You, as one person, identified by your email address. One account can belong to several organizations.
Organization. Your company's space in Productmind. When you start one you become its Owner. See Organizations and workspaces.
Invitation. An email from an organization's Owner or an Admin that lets you join their organization. The link in it works for 7 days.
Referral. A personal sign-up link a current customer sends you, so you can start an organization of your own.
Getting an account
You sign up from the Sign up page, or follow the link in an invitation or a referral.
To join your team's organization
-
Open the invitation email and follow its link.
The page reads You have been invited to join your team's organization.
-
If you're new to Productmind, either:
- choose Sign up with Google, or
- enter your First name and Last name, set a Password of at least 8 characters, enter it again under Confirm password, and choose Join now. The Email is the address the invitation was sent to.
-
If you already have a Productmind account, choose Accept invitation. Decline leaves the invitation unused.
If you already have an account, you don't need the email at all: the invitation is also on your profile, under Pending invitations. See Profile and notifications.
You join the organization with the role and the workspaces the person who invited you chose, and Productmind opens it.
If you already have an account and weren't signed in when you accepted, sign in afterwards and switch to the new organization from your profile. See Organizations and workspaces.
If the organization requires two-factor authentication and you didn't sign in with a code or through that organization's own single sign-on, you still join it, but it doesn't open yet: you stay in the organization you were in, and a message says what to do. Set up an authenticator on your profile if you haven't, sign out, sign in again with a code, and then switch to the organization.
To start an organization from a referral
-
Open the referral email and follow its link.
The page reads Welcome to your product mind! and names the person who referred you.
-
Enter your First name and Last name. The Email is the address the referral was sent to, and can't be changed.
-
Set a Password of at least 8 characters, and enter it again under Confirm password.
-
Enter your Organization name, usually your company or team, and choose your Country. The organization name is optional: left blank, your organization is named after you.
-
Choose Create account.
Your organization is created with one workspace, Main, and you are its Owner. Productmind signs you in and opens the setup steps.
To start an organization
- On the sign-in page, choose Sign up.
- Either choose Sign up with Google, or enter your First name, Last name and Email, set a Password of at least 8 characters, and enter it again under Confirm password.
- Enter your Organization name, usually your company or team, and choose your Country. The organization name is optional: left blank, your organization is named after you.
- Accept the Terms and Conditions and the Data Processing Agreement on behalf of your organization.
- Choose Create account.
Your organization is created with one workspace, Main, and you are its Owner. Productmind sends you an email to confirm your address: open its link, then sign in, and Productmind opens the setup steps.
Setting up your workspace
The first time you open a workspace whose setup nobody has finished, Productmind shows the setup steps before the Dashboard. A new organization verifies its account first: until it has, every page you open shows the setup.
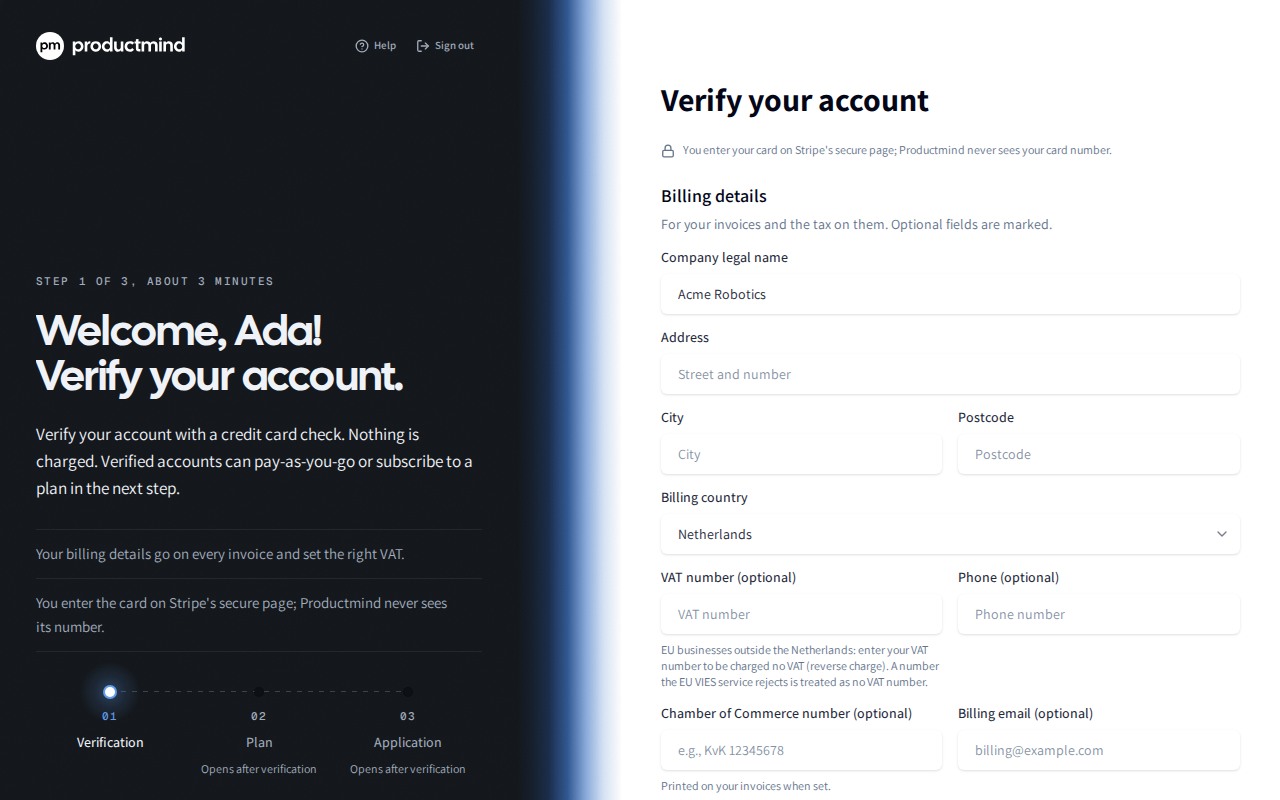
| Step | What you do |
|---|---|
| Verification | Enter your billing details, then add a card. It confirms your account is a real one, and lets you choose a plan and pay for what you use. Nothing is charged. |
| Plan | Choose a plan and a top-up of your Pay-as-you-go balance, check what you pay today, then choose Confirm and pay. |
That's the whole setup: when you finish Plan, the Dashboard opens. There, What shall we build today? asks how you want to start: a new application from a template, or the one you already have. See Getting started.
The left side of the screen says what each step is for and why it is worth doing. Below it, the two steps sit along a line that lights up to the step you're on. On a phone, this part is at the top of the screen, above the step.
Neither step can be skipped. Plan opens once Verification is done, and until then the line says Opens after verification. Choose a step you have done on the line to open it again. If you leave and come back, the setup opens on the first step you haven't finished.
Help and Sign out are on every step (as icons when the screen is narrow), at the top of the setup beside the Productmind logo. See Leaving the setup.
Verifying your account
Your card confirms your account is a real one, and lets you choose a plan and pay for what you use. Your bank checks it when you add it, and nothing is charged.
- Check your billing details: the name and address to put on your invoices, your country, your VAT number if you have one, and optionally a Chamber of Commerce number, a phone number and a Billing email (optional). They are saved as your organization's default billing profile, which pays your subscription and auto-recharge, and the billing email becomes its primary billing contact. You can add more billing contacts later. See Payment & Billing details.
- Choose Verify card. Stripe's secure page opens.
- Enter your card. Your bank checks it, and nothing is charged. Productmind never sees your card number.
When you come back, the setup confirms your card and moves on to Plan. If no card was saved, because you cancelled or your bank declined the card, the step says We couldn't verify a card and you can try again.
If Stripe's page can't be opened, nothing is charged, and the step says why in an alert above the form, such as Card verification is temporarily unavailable. Choose Try again, or Contact support to open a support request in the Support center with the error and the time filled in. If Stripe refused your billing details, the alert says Check your billing details and has no Try again: correct the details in the form, and choose Verify card again.
If your organization already has a card on file, the step shows it and you choose Continue. If your organization pays by invoice, no card is needed.
Only your organization's Owner can verify its account. Until the Owner has, everyone else in the organization sees Waiting for your account to be verified wherever they go in Productmind. Choose Check again to look again; the setup also opens by itself once the account is verified.
Choosing a plan
Each plan is a card that shows:
- its price. A plan with no monthly fee reads Pay-as-you-go. A per-user plan shows its price per user and month, and on annual billing its price per user and year, 20% below paying monthly;
- its price per 1M AI credits. AI credits measure every AI task, from a chat message to a scan of your code;
- what sets it apart from the other plans, such as how many workspaces it includes.
Prices exclude VAT. To see everything each plan includes, what typical tasks cost on it, and the price of hosted sandboxes, voice interviews and the notetaker, choose Compare plans. Choosing a plan there chooses it on the step too. Feature discovery and application scanning are on every plan. For custom terms, choose Need custom terms? Contact us to email Productmind.
Turn on Annual billing to pay annually, then choose a plan's card. The plan with no monthly fee is chosen until you choose another. If you have a discount code, choose Have a discount code? and enter it.
If you chose a plan on the Productmind pricing page before you signed up, that plan and its billing are chosen for you, and the step says so, such as "You chose Start on our website. You can change it below." This works when you finish signing up in the same browser. If your organization already pays for a plan, the step shows it, and you change plans later in Billing & Payments.
Topping up your balance
AI credits and other usage are paid from your Pay-as-you-go balance, on every plan. Choose a top-up of €50, €100, €250 or €500, or Top up later to top up from Billing & Payments when you need to, where any amount from €10 is available. €100 is Recommended and chosen for you on every plan, and it stays chosen when you choose another plan. A line under the heading says why: AI credits are paid from this balance, and your first top-up activates pay-as-you-go.
If you come back to Plan after confirming your plan, no top-up is chosen for you, so confirming again never pays twice by accident.
If you skip the top-up on a per-user plan while your balance is €0.00 or less, the step says so under the choices: AI replies and coding sessions ask you to top up first. You can top up any time from Billing & Payments.
What you pay today
Under the top-up, Due today lists what you pay when you confirm:
- the plan you chose, billed monthly or annually, for your organization's active members on a per-user plan;
- a discount code's reduction, and how long it lasts;
- the top-up.
With Annual billing on, the plan's row shows what a year billed monthly would cost, struck through, above the annual price, and a line under the rows says what you save, such as "Annual billing saves you €239.96 a year (20%)."
Then the total. For an organization billed in the Netherlands it is one total with the VAT in it, such as "€241.96" and "Incl. 21% VAT (€41.99)."; for any other country it is the amount plus VAT, which is calculated at checkout. Under the total, Due today says how each part is paid and when your plan renews. If you pay for nothing, it says "Nothing is charged today."
Confirming
Choose Confirm and pay, or Finish setup when nothing is charged. The setup then goes in this order:
- On a per-user plan, the card you verified is charged for the plan, as Due today shows.
- If you chose a top-up, you pay it on Stripe's secure page, by card or, where Stripe offers it, with iDEAL. Stripe asks for your card again there.
- The setup is done, and the Dashboard opens.
The subscription and the top-up are billed to your default billing profile: the details you entered on Verification.
If you cancel on Stripe's page, nothing is charged, and you come back to the step with your choices kept. If your payment didn't go through, the step says "This checkout was not completed. Nothing was charged." and offers your choices again.
If your top-up hasn't reached your balance when you come back, the setup still moves on. The step says "We received your payment and are applying it to your balance.", and the top-up arrives within minutes. If your bank is still processing it, it says "Your payment is processing at your bank. It's applied to your balance as soon as it arrives."
If your organization pays by invoice, there is nothing to choose: you just choose Confirm.
Leaving the setup
Verification and Plan are skipped, marked Owner or Admin only, when they aren't yours: only an Owner can verify a card, and only an Owner or Admin can choose a plan and pay. If neither step is yours and your account is verified, there is nothing for you to do: the setup finishes as soon as you open it, and the Dashboard opens.
Help and Sign out are on every step, and while you wait for your account to be verified, at the top of the setup beside the Productmind logo.
- Help opens the Support center: the User Guide's section on the setup, the assistant, and your support requests.
- Sign out signs you out of this browser. When you sign in again, the setup opens where you left it, and in the same browser your choices on Plan are kept.
Signing in
To sign in with your email and password
- Enter your Email, and choose Continue.
- Enter your Password, and choose Sign in.
- If your account uses two-factor authentication, enter the 6-digit code from your authenticator app. Productmind checks it as soon as you type the last digit.
Productmind opens the page you were trying to reach, or the Dashboard.
If you haven't confirmed your email address yet, the page says Your email address is not confirmed yet. Open the link in the email we sent you, or choose Send a new link to get a new one.
To sign in with Google
- Choose Sign in with Google.
- Choose your Google account.
- If your account uses two-factor authentication, enter the 6-digit code from your authenticator app.
This works once you have a Productmind account with the same email address. If you first signed in with a different Google account, use that one, or your email and password.
To sign in with single sign-on
- Enter your work Email, and choose Continue.
- Choose Continue with SSO.
- Sign in at your company's identity provider.
Continue with SSO appears when your email's domain belongs to an organization that uses single sign-on. If your organization requires it, the page says Your organization requires single sign-on. Owners can still use a password. To use your password instead, choose Continue with password authentication. When your organization requires single sign-on, only the Owner can sign in that way. See Single sign-on.
Signing in with single sign-on opens that organization only. If you belong to other organizations too, opening one of them asks you to sign in again. See Organizations and workspaces.
To sign in with a recovery code
Use this if you can't reach your authenticator app.
- Sign in with your email and password, or with Google, as usual.
- When Productmind asks for the 6-digit code, choose Use a recovery code instead.
- Enter one of your recovery codes, and choose Verify.
Each recovery code works once. Use a recovery code instead appears only while you have unused codes left.
To reset a forgotten password
-
On the sign-in page, enter your email and choose Continue, then choose Forgot your password?
-
Enter your Email, and choose Send reset link.
The page reads Check your email.
-
Open the email and follow its link.
-
Enter a New password, enter it again under Confirm password, and choose Reset password.
The page confirms Your password has been updated. Choose Sign in to sign in with it.
Resetting your password signs you out everywhere: every browser and device, including the one you used to reset it, and every app connected to your account, such as AI assistants, the Productmind CLI and the browser extension. Sign in again on each one with the new password.
To sign out
- At the bottom of the sidebar, choose your avatar.
- Choose Sign out.
During the setup, choose Sign out at the top of the setup, beside the Productmind logo.
This signs out this browser only. To sign out your other browsers and devices, see Profile and notifications.
How signing in behaves
Two-factor authentication. Once you set up an authenticator app, Productmind asks for a code every time you sign in, with a password or with Google. If your organization requires two-factor authentication and you haven't set it up, Productmind walks you through setting it up when you sign in to it, or right after you create your account from an invitation, before you can use the app. Switching to it from another organization needs a sign-in that used a code. See Multi-factor.
Which organization opens. If you belong to several organizations, signing in opens the one you used last in this browser.
Troubleshooting
"Invalid invitation"
The invitation was revoked or already used, or it was sent again, which replaces the link in the earlier email. Use the link in the latest invitation email, or ask an Owner or Admin of the organization to resend it.
"Invitation has expired", or nothing happens when I choose Accept invitation
The invitation is more than 7 days old. The page still reads You have been invited, but the invitation can't be used. Ask an Owner or Admin of the organization to resend it, and use the link in the new email.
"This referral link is no longer valid"
The link has expired, was revoked, or was already used. Ask the person who sent it for a new one.
"That code is not right"
Codes change every 30 seconds. Enter the current code from your authenticator app. If it keeps failing, check that your phone's clock is set automatically.
"That sign-in attempt has expired"
You took more than 5 minutes to enter the code. Choose Back to sign in, and sign in again.
"Too many incorrect codes"
After five wrong codes, Productmind stops asking. Choose Back to sign in, and sign in again.
"Too many incorrect codes have been entered for this account"
Too many wrong codes were entered for your account across several sign-ins, so signing in with your password or Google is paused for a while. The message says when you can try again, and a recovery code has to wait too. Wrong codes keep counting for up to a day, even after you sign in successfully.
If you didn't enter those codes, someone else knows your password or is signed in to your account. Reset your password (see To reset a forgotten password). That signs your account out everywhere and stops the wrong codes, but not the pause: you can sign in again once it ends, within a day at most.
I lost my authenticator and my recovery codes
Contact Productmind support.