

Integrations
Integrations connects your workspace to the tools your team already uses. Connect your Git provider so Productmind can reach your repositories, your issue tracker to import work, Slack to post updates to a channel, or your helpdesk to bring in customer conversations. You can also connect your own MCP servers for your agents. Everyone, whatever their role, can connect their own accounts in those tools, and see which MCP clients on their machine, such as Claude Code, are connected to Productmind.
Key concepts
Integration. A tool Productmind can connect to, such as Jira or Slack. Each one appears as a card in the catalog.
Connection. Your workspace's link to one of those tools. A connection belongs to the workspace you are in: each workspace connects its own tools.
Workspace integration. A connection that acts on behalf of Productmind, for everyone in the workspace. For example, the Slack integration posts workspace activity to a channel.
User connection. A connection to your own account in a tool, so Productmind can act as you. Several tools have both kinds, which is why the catalog lists, for example, both GitHub and GitHub (User).
Automation. Something an integration can do on its own when an event happens in the connected tool. Each automation has an on/off switch on the integration's page.
The Integrations page at a glance
At the top-right of any page, choose the Integrations icon, then View all in the Integrations panel that opens. With the Owner or Admin role, you can also choose Integrations in the sidebar, under Settings.
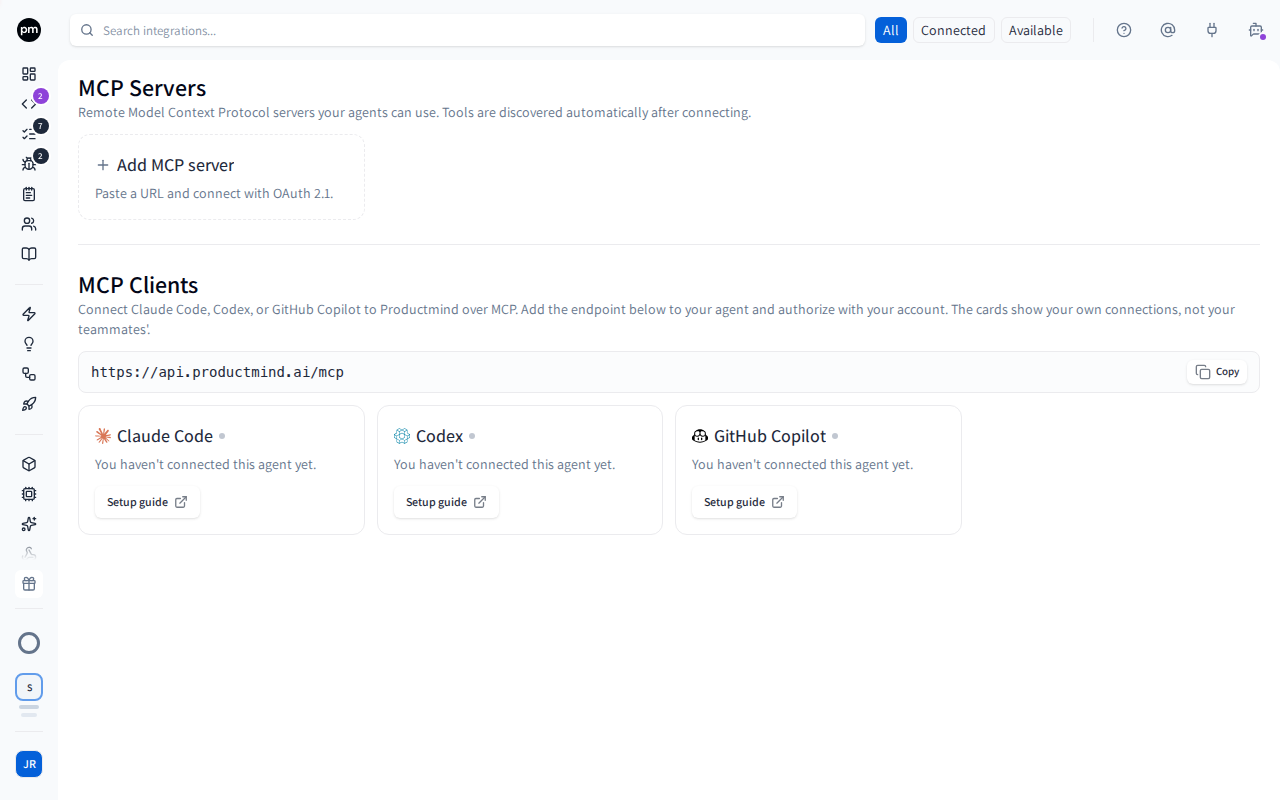
The toolbar holds the search box, which matches names and descriptions, and three filters: All, Connected and Available. Search and the filters apply to the tool cards under User connections and Workspace integrations, not to MCP Servers or MCP Clients. When nothing matches, the page says "No integrations found. Try a different search term." Productmind remembers your search and filter for this workspace in this browser.
The page has up to four sections, from top to bottom:
| Section | Who sees it | What it holds |
|---|---|---|
| MCP Servers | Owner and Admin | Add MCP server, then one card for each MCP server you have connected. See MCP Servers. |
| MCP Clients | Everyone | The address MCP clients use to connect to Productmind, and a card each for Claude Code, Codex and GitHub Copilot. See MCP Clients. |
| User connections | Everyone | Tools you connect with your own account: "Perform actions on behalf of your connected user." |
| Workspace integrations | Owner and Admin | Tools connected for the whole workspace: "System-level integrations that act on behalf of Productmind." |
With any other role, the page shows MCP Clients and User connections. If your organization's plan doesn't include Integrations, an Owner or Admin sees one card naming the plan that does, in place of MCP Servers and Workspace integrations.
Each integration card shows the tool's logo, name, status (Connected or Not connected) and description. Needs reconnect means the tool is still connected to your workspace but has stopped working, and someone has to reconnect it: see To reconnect a tool that stopped working. Such a card stays under the Connected filter. If the integration offers automations, the card says how many, for example 3 automations. Choosing a card connects the tool, or opens its page if it is connected: the card says Connect, Manage or Reconnect. Each section says how many of its tools are connected.
The catalog includes:
| Group | Tools |
|---|---|
| User connections | GitHub (User), GitLab (User), Bitbucket (User), Slack (User), Google |
| Workspace integrations | Asana, Bitbucket, Confluence, Freshdesk, GitHub, GitLab, Jira, Linear, Notion, Slack, Zendesk |
The Integrations panel
The Integrations tab of the activity panel opens the same catalog beside any page, with a tab for each group: Workspace, User, MCP Servers and MCP Clients. With a role other than Owner or Admin, you see User and MCP Clients. Productmind remembers the tab you last had open. Choose View all to open the Integrations page.
Connecting a tool
To connect a tool
- Open the Integrations page: at the top-right of the page, choose the Integrations icon, then View all.
- Find the tool's card, and choose it. With a role other than Owner or Admin, the page lists the tools under User connections, which you connect with your own account.
- Do what the tool asks for. Depending on the tool, Productmind either takes you straight to the tool to approve access, or opens a Connect dialog first.
- If you are taken to the tool, sign in there if you need to, and approve access.
You return to Integrations, which shows "Tool connected successfully", and the card reads Connected.
The Connect dialog can offer up to three ways to connect, as tabs:
| Tab | How it works |
|---|---|
| OAuth | Choose Authorize, and approve access in the tool. |
| Own OAuth app | For a tool that runs on your own server, or for an OAuth application of your own. Create the application in the tool, paste the callback URL the dialog shows into it, then enter the application's credentials and choose Authorize. |
| Access token | Paste a token or API key you created in the tool, and choose Connect. You can also give the connection a name. |
When a tool offers only one way, the dialog shows it without tabs. For GitLab, each tab says which application or token to create, with which scopes and role.
If the tool refuses what you entered, for example a token it rejects, the dialog says why and keeps what you entered, so you can correct it.
Some tools ask an administrator of the tool to approve the installation. Until they do, Productmind shows "Installation is pending org admin approval. It will activate once approved."
To connect GitHub
GitHub connects through the Productmind GitHub App, which you install on a GitHub organization or on your personal GitHub account. Only an owner of the organization, or the owner of the personal account, can complete the connection.
- In the sidebar, choose Integrations.
- Under Workspace integrations, choose GitHub.
- On GitHub, choose the organization or account to install the app on, and the repositories Productmind can access.
- The first time you connect GitHub, GitHub asks you to authorize Productmind. Approve it. GitHub asks you only once, not every time you connect.
Productmind checks with GitHub that you own the organization or account the app is installed on, and then completes the connection. You return to Integrations, which shows "GitHub connected successfully", and the GitHub card reads Connected.
If you are not an owner, ask an owner of the organization to connect GitHub. See Only an owner can connect GitHub.
To connect GitLab
Connect GitLab for the workspace once. The way you connect it decides how everyone in the workspace connects their own GitLab account later:
| Tab | What you set up | How members connect their own account |
|---|---|---|
| OAuth | Approve Productmind's GitLab.com application. | They sign in to GitLab.com through the same application. |
| Own OAuth app | An OAuth application of your own, on your GitLab server or in a GitLab.com group. | They sign in through your application, on your server. Nobody creates another application. |
| Access token | An access token, usually a group access token. | They connect a personal access token of their own, on your server. |
- In the sidebar, choose Integrations.
- Under Workspace integrations, choose GitLab.
- Choose a tab, and follow the steps the dialog shows.
You return to Integrations, which shows "GitLab connected successfully", and the GitLab card reads Connected. GitLab's page then shows the account Productmind acts as, and lets you move between a token and OAuth without disconnecting: see Managing the GitLab connection.
To set up your own GitLab OAuth application
- In GitLab, create the application once, in one of these places:
- Group › Settings › Applications (recommended): the application belongs to the group.
- Admin › Applications: for the whole GitLab server. Mark it Trusted so members don't see an approval screen.
- Edit profile › Applications: the application belongs to your own account.
- Set its Redirect URI to the callback URL that the Own OAuth app tab of the Connect GitLab dialog shows. Choose the copy button beside it to copy it.
- Turn Confidential on, and select the scopes api and read_user.
- Save the application.
- In the Own OAuth app tab, enter your GitLab server's address under Instance URL (leave it empty for GitLab.com), then paste the Application ID and Secret.
- Choose Authorize, and approve access in GitLab.
Your members sign in through this application. They never create one of their own.
Which GitLab access token to create
- A group access token is the one for a team: it reaches every project in the group, and it keeps working when people leave. A project access token reaches one project, and a personal access token acts as the person who created it.
- Give it at least the Developer role, and Maintainer where only Maintainers may merge into protected branches.
- Give it the scopes api, read_repository and write_repository. Group and project tokens need the repository scopes for the sessions' clones and pushes.
- Access tokens expire. Replace the token before its expiry date.
To open a connected tool's page
- Open the Integrations page: at the top-right of the page, choose the Integrations icon, then View all.
- Choose the tool's card. A connected card says Manage where an unconnected one says Connect.
The tool's page opens. Every role can open the page of a tool connected with their own account, under User connections, to check it or disconnect it. The page of a workspace integration or an MCP server is for the Owner and Admin roles: with any other role, Productmind takes you back to Integrations. The tool's page shows:
- its status, description and connection date, with its own actions, such as an import button, and Disconnect;
- depending on the tool, Notifications, Automations, webhook details or Tools available.
To disconnect a tool
- Open the tool's page.
- Choose Disconnect.
- Read what disconnecting does, and choose Disconnect again to confirm. For most tools, Productmind says "Workflows depending on it will stop."
Productmind shows "Name disconnected", and you return to Integrations.
Anything that relies on the connection stops working until you connect the tool again: for example, imports, automations, channel notifications, or access to the repositories behind your applications.
Disconnecting GitHub also uninstalls the Productmind GitHub App from the GitHub organization or account it was installed on, and the confirmation says so. To connect GitHub again, an owner installs the app again and chooses its repositories again.
Disconnecting GitLab also ends Productmind's access at GitLab when the connection was made with OAuth, the workspace's connection and a member's own alike. A connection made with an access token leaves the token valid: revoke it in GitLab if it is no longer needed.
Connecting GitLab again after disconnecting it makes a new connection with a new Webhook URL. Productmind moves each project's webhook onto it where the connection's GitLab account can manage the project's webhooks; give the other projects' webhooks the new URL in GitLab. Members who signed in through it sign in again. To change the token or the account, use the Connection tab on GitLab's page instead: see Managing the GitLab connection.
To reconnect a tool that stopped working
When a tool refuses to renew Productmind's access, for example because someone revoked it in the tool, its card shows Needs reconnect and the tool's page shows This connection needs re-authorising with the date it started failing.
- Open the tool's page.
- Choose Reconnect.
- If the Connect dialog opens, for example because you connected the tool with your own OAuth client, enter the details again and choose Authorize.
- Approve access in the tool again.
You return to the tool's page, and This connection needs re-authorising is gone.
To reconnect GitHub
When the Productmind GitHub App is uninstalled from the GitHub organization or account, or suspended there, Productmind can no longer reach your repositories. The GitHub card shows Needs reconnect, and GitHub's page shows GitHub can no longer reach this connection with the date it started failing.
- Open GitHub's page.
- Choose Reconnect.
- On GitHub, install the app on the organization or account again, and choose its repositories. As with a first connection, only an owner of the organization, or the owner of the personal account, can complete this.
- If GitHub asks you to authorize Productmind, approve it.
You return to Integrations, which shows "GitHub connected successfully", and the card reads Connected. The connection is the same one as before, so your applications and sessions keep their repository links.
If the app was suspended rather than uninstalled, an owner of the organization can also unsuspend it in the organization's GitHub settings. The connection then recovers on its own, without reconnecting.
Working with connected tools
Git providers
GitHub, GitLab and Bitbucket give Productmind access to the repositories behind your applications and coding sessions.
GitHub (User), GitLab (User) and Bitbucket (User) connect your own account. The pull requests of a coding session you create are then opened as you, in every repository your account can push to, and the workspace's connection opens the rest. When your workspace pushes as the session's creator, your account pushes the session's changes too, for now on GitLab and Bitbucket only: see Who pushes a session's code. You can connect your account from the session itself, under Draft a plan. See Who opens the pull requests.
The workspace's GitLab connection. Productmind reads your projects, pushes the sessions' branches and opens their merge requests with it, as the account it acts as: see Managing the GitLab connection. That account is the committer of every commit it pushes, so GitLab push rules that check the committer accept them. When your workspace pushes as the session's creator, the creator's own account pushes wherever it can, and is then the committer.
To connect your own GitLab account
How you connect GitLab (User) depends on how your workspace connected GitLab:
| Your workspace connected GitLab with | When you choose Connect GitLab |
|---|---|
| Productmind's GitLab.com application, or its own OAuth application | GitLab's sign-in page opens straight away, on your workspace's GitLab. Approve access. |
| An access token | The Connect dialog asks for a personal access token. Instance URL is your workspace's GitLab, filled in for you. |
| Nothing yet | The dialog offers Authorize, which signs you in to GitLab.com. Using a self-hosted GitLab? An admin connects GitLab for the workspace first, then you connect to it. |
When the dialog asks for a token, create a personal access token on your own account:
- In GitLab, go to Edit profile › Access tokens, or choose Create token on your GitLab server in the dialog, which opens that page with the name and scope filled in.
- Give the token the api scope: GitLab has no narrower scope that can open a merge request as you.
- Copy the token, paste it into Personal access token, and choose Connect.
Productmind shows "GitLab (User) connected successfully". Your account needs at least the Developer role on the projects your sessions change. Group and project access tokens act as a bot, not as you, and are refused.
If you reinstalled or changed Productmind's access in your Git provider and your applications can no longer reach their repositories, open the provider's page and choose Repair repository links. Productmind points the applications, sessions, releases and channel notifications that used the old connection at the current one, and tells you how many links it repaired, and which repositories it still can't reach. On GitLab it also moves each project's webhook that still delivers to the old connection onto the current one, and says how many it moved and how many it could not check. It is safe to choose more than once. The button is there for the Owner and Admin roles, and for anyone with Applications: Update.
Managing the GitLab connection
Every clone, push, merge request and merge that a session, a scan or a release makes on GitLab goes through the workspace's GitLab connection, as the GitLab account behind it, except the merge requests opened as their session's creator, and the pushes of a workspace that pushes as the session's creator. GitLab's page shows that account, what it can do on your applications' repositories, and the webhook that keeps Productmind told about merge requests, in four tabs:
Acts as names the account, whether it's a person or a bot, how it's connected (OAuth or Access token) and on which GitLab server.
- With an access token, Productmind acts as the token's account: a group or project access token acts as its bot user, and a personal access token as the person who created it.
- With OAuth, Productmind acts as the person who approved access. Commits, merge requests and merges carry their name, with their role on each project, and the connection stops working if they leave or lose access. Approve with a GitLab account kept for Productmind, not your own.
To change the token or the account without disconnecting:
- Choose Switch to OAuth or Replace token (a token connection), or Authorize again or Switch to access token (an OAuth connection). Your GitLab server's address is filled in and locked: another server is a new connection.
- For OAuth, enter your GitLab application's Application ID and Secret (on GitLab.com you can choose Productmind's application instead), choose Authorize, and approve access in GitLab as the account Productmind should act as. For a token, paste it into Access token and choose Save token.
Acts as names the new account. The connection is the same one, so your applications' repository links and the webhook keep working, and so do members' own personal access tokens. With another OAuth application, or a token in place of OAuth, members who signed in through the old application connect their GitLab account again.
GitLab's OAuth access expires after two hours, and Productmind renews it on its own. Leave Admin › Settings › General › Account and limit › Maximum allowable lifetime for OAuth access tokens at two hours: each renewal ends the access a running session holds, which it then has to get again, so a shorter lifetime means more of that. If GitLab refuses, for example because the application was deleted or its secret changed, the card shows Needs reconnect: choose Authorize again. An access token expires on the date you chose: replace it before then.
What the account can do on each application's repository, checked with GitLab when you open the page. Choose Check again after you change a role in GitLab.
| What Productmind does | Role the account needs on the project |
|---|---|
| Read code and branches, clone for scans and sessions | Reporter |
| Push a session's branch, open and update merge requests, tag a release | Developer |
| Merge into a protected branch, for a session or a release | Whichever role the branch's protection allows to merge: Maintainer by default |
Each repository shows Full access, Cannot merge into a branch (the merge needs the role named, or a person merges in GitLab), Read only (sessions can't push: the account needs Developer), Not visible (add the account to the project) or Not checked (GitLab didn't answer: check again).
GitLab tells Productmind about merge requests through a webhook on each project. Without it, Productmind never learns that a session's merge request was merged or closed.
Productmind adds the webhook itself when an application is linked to a GitLab project, wherever the connection's GitLab account can manage the project's webhooks: that takes the Maintainer or Owner role on the project, or an administrator of the GitLab server. Project webhooks lists every project your applications use, read from GitLab when you open the tab:
| Status | What it means |
|---|---|
| Delivers to Productmind | The webhook sends the project's merge requests to Productmind. |
| Added by Productmind or Re-pointed to this connection | Productmind just added the webhook, or moved it from a connection that was replaced. |
| Not added yet or Points at an old connection | Choose Add webhooks. |
| Add it by hand | The connection's account can't manage the project's webhooks. Give the account the Maintainer role and choose Add webhooks. A webhook added with the steps below doesn't update sessions and releases. |
| GitLab turned it off after failed deliveries | In GitLab, send a test request from the webhook: GitLab turns it back on once one succeeds. |
| Not found or Could not add it | GitLab's own reason is shown. |
Add webhooks adds the missing webhooks, moves the ones that point at an old connection, and sets the connection's secret again on the others. Productmind keeps a secret for each GitLab connection, sets it on the webhooks it adds through that connection, and never shows it to anyone. It is listed under Webhook secrets as Productmind: revoking it stops those webhooks until you choose Add webhooks again. Productmind never removes a webhook. Choose Check again after you change a role in GitLab.
Only the webhooks Productmind adds update your sessions and releases. Webhooks set up before each connection had a secret of its own no longer do: choose Add webhooks once on each GitLab connection to give them its secret. Then, under Webhook secrets, revoke the secret marked Earlier secret: no webhook needs it any more.
A webhook you add by hand no longer updates sessions and releases either: its token is one someone in your workspace holds, so Productmind can't tell its deliveries from anyone else's. Where you can, give the connection's account the Maintainer role and choose Add webhooks instead.
To add the webhook by hand, on a project marked Add it by hand (the Webhook tab lists these steps too):
- On the Webhook tab, copy the Webhook URL.
- In GitLab, open the project's Settings › Webhooks and choose Add new webhook. It takes the Maintainer role.
- Paste the URL into URL. Choose Generate signing token, and copy the token GitLab shows: it shows it only once.
- Back on the Webhook tab, under Signing tokens, paste the token into Signing token, optionally enter the project's name in Project, and choose Add signing token.
- In GitLab, under Trigger, select Merge request events, and choose Add webhook.
Every project's webhook has its own signing token, so add one for each project. Each token you add is listed under Webhook secrets with its project and its last four characters, and you can revoke it there.
Instead of a signing token, a webhook can use a secret token: under Webhook secrets, choose Mint new secret, then Mint secret, copy the secret, and paste it into GitLab's Secret token. One secret serves every project. GitLab marks the secret token as not recommended, and a webhook may have both.
GitLab turns a webhook off after deliveries fail. Once its token is added, open the webhook in GitLab and send a test request: when the test succeeds, GitLab turns the webhook back on.
Replacing the token or the account keeps the Webhook URL. Disconnecting GitLab and connecting it again makes a new connection with a new URL: Productmind moves the webhooks the account can manage onto it, and the ones added by hand need the new URL.
GitLab to Productmind MR Event passes each merge request your webhook reports as opened, closed, merged or reopened to Productmind, which links it to its session, records deployments and advances releases. Keep it on.
Jira and Asana
Once Jira or Asana is connected, its page offers Import tasks from Jira or Import tasks from Asana. Both open the same import wizard as Tasks. See Tasks.
When you connect Jira in the Connect dialog, choose OAuth to approve access in Atlassian, or Access token to enter your Atlassian account email, an API token and your Jira Cloud URL. Asana offers OAuth or an Asana personal access token.
Freshdesk and Zendesk
Connect a helpdesk to import its support conversations into Productmind. See Freshdesk and Zendesk.
Slack notifications
Once Slack is connected, its page has a Notifications section, where you choose which channels Productmind posts workspace activity to: new work, status changes and assignments. Description edits and reordering are not posted.
Each post opens with one line that says what happened and who did it, starting with the kind of item, for example "Task status changed to Done by @alex". Below it, a card shows a short summary when there is one, then the item's status and other details. A link to the item follows on a line of its own, then an Open button. A small gray line closes the card with the Productmind logo, the item's path, for example "tasks/513", and when it happened in your own time zone, for example "Today at 11:23 AM".
To post workspace activity to a Slack channel
- Open the Slack page, and under Notifications, choose Add channel.
- Under Channel, choose the channel.
- Under Events, select the events it should receive. They are grouped by Features, Feature requests, Bug reports, Tasks, Code and Releases.
- Choose Add channel.
The channel appears in the list, with the groups of events it receives. Use its switch to pause it, Edit channel to change it, or Remove channel to stop posting there.
Productmind must be a member of a private channel before it can post there. If a delivery fails, the channel's row says why, for example "Invite the Productmind bot to #channel".
MCP Servers
An MCP (Model Context Protocol) server gives your agents extra tools, such as reading from another system your team uses. Once connected, you can attach it to a custom agent. You can also connect an MCP server while you attach one to a custom agent. See Definitions. MCP Servers is for the Owner and Admin roles.
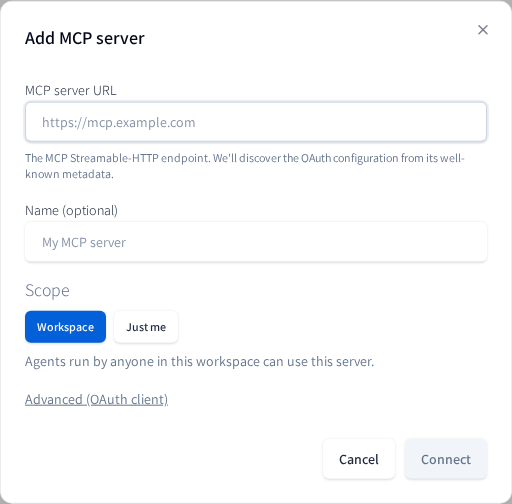
To connect an MCP server
- On Integrations, under MCP Servers, choose Add MCP server.
- Enter the MCP server URL. Productmind finds out from the server how to sign in to it.
- If you want, enter a name under Name (optional).
- Under Scope, choose:
- Workspace: "Agents run by anyone in this workspace can use this server."
- Just me: "Only agents run on your behalf can use this server."
- Choose Connect.
- If the server needs you to sign in, you are taken to it. Approve access there.
Productmind shows "MCP server connected", and a card for the server appears under MCP Servers, showing its name, its host name, You or Workspace, and how it signs in.
If the server can't register Productmind by itself, Productmind shows "This MCP server requires an OAuth Client ID and Secret. Please fill them in below." and opens Advanced (OAuth client). Enter the OAuth Client ID and, if the server needs one, the OAuth Client Secret, and choose Connect again.
To choose which of a server's tools agents can use
- On Integrations, under MCP Servers, choose the server's card.
- Under Tools available, turn a tool on or off. The Filter tools box narrows a long list.
The switch shows the tool's new state, and the change is saved at once.
Productmind lists a server's tools the first time you open its page, and Last synced shows when. Choose Refresh to load them again after the server changes.
MCP Clients
MCP Clients shows the address that MCP clients, such as Claude Code, Codex and GitHub Copilot, use to connect to Productmind. Every role sees it. Choose Copy to copy the address, and add it to your agent. Each agent's card has a Setup guide link to that agent's own instructions.
An agent's card says You're connected once you have signed in to Productmind from that agent, and Not connected until then. The cards show your own connections, not your teammates'. See AI assistants (MCP).
How integrations behave
Connections belong to a workspace. Connecting a tool in one workspace doesn't connect it in your other workspaces.
Imports also connect. The import wizards, for example Import from Jira on Tasks, start with a Connect step when the tool isn't connected yet. Anyone who can run the import can connect the tool there, without the Owner or Admin role. A tool connected there appears as connected here.
Your own accounts connect where you are asked to. Besides User connections, you can connect your own Slack account from your profile, and your own GitHub, GitLab or Bitbucket account from a coding session you created. Either way, it appears as connected here.
Permissions
| To | You need |
|---|---|
| Open Integrations, see MCP Clients, and connect, open and disconnect your own accounts under User connections | Any role |
| See Integrations in the sidebar | The Owner or Admin role |
| See MCP Servers and Workspace integrations, connect those tools and servers, disconnect them, and change their settings (automations, filters, notification channels) | The Owner or Admin role |
| Choose Repair repository links | The Owner or Admin role, or Applications: Update |
| Connect GitHub | The Owner or Admin role, and in GitHub, being an owner of the organization the app is installed on, or the owner of the personal account |
| Connect Jira or Asana from the import wizard on Tasks | Tasks: Create |
| Connect Freshdesk or Zendesk from the import wizard on Customer support | Customer meetings & support: Create |
Troubleshooting
Integrations is missing from the menu
The sidebar shows Integrations to the Owner and Admin roles. With any other role, choose the Integrations icon at the top-right of the page, then View all.
MCP Servers and Workspace integrations are missing
They are for the Owner and Admin roles. Ask one of them to connect a workspace tool or an MCP server. If you have one of those roles and see a card naming a plan in their place, your organization's plan doesn't include Integrations.
A tool's page takes you back to Integrations
The page of a workspace integration or an MCP server is for the Owner and Admin roles. With any other role, Productmind takes you back to Integrations. You can open the page of a tool you connected with your own account, under User connections.
"Connection failed" after approving access
The tool didn't complete the connection. Try again. For Own OAuth app, check that the callback URL in your OAuth application matches the one in the Connect dialog exactly.
"Your workspace's GitLab application doesn't allow the access Productmind asks for."
The OAuth application your workspace's GitLab connection uses doesn't allow a scope Productmind asks for. In GitLab, open the application and select the scopes api and read_user, then connect again. A member who sees this message asks an admin to change the application.
"Your workspace's GitLab connection changed while you were signing in."
An admin connected your workspace's GitLab through another application, or disconnected it, while you were signing in. Connect your GitLab account again.
"GitLab did not grant the api scope, so nothing was saved."
GitLab approved access without the api scope, which every clone, push and merge request needs. In GitLab, open your application, select the scopes api and read_user, save it, and connect again. If you were replacing the connection, it still works as before.
GitLab says "The requested scope is invalid, unknown, or malformed."
Your GitLab application lacks a scope Productmind asks for, so GitLab stops before you can approve, and you stay on its page. In GitLab, open the application, select the scopes api and read_user, save it, and connect again from Productmind. Nothing changed in Productmind: a connection you were replacing still works as before.
Replacing GitLab's connection says it is on another server
A replacement must use the same GitLab server as the connection: its applications, sessions and webhook name projects on that server. Projects on two GitLab servers are different projects, even with the same number or path. To use another server, disconnect GitLab and connect it again, then choose Add webhooks on the Webhook tab, and give the projects marked Add it by hand the new Webhook URL.
Merge requests stopped updating sessions after GitLab was reconnected
Disconnecting and connecting GitLab again made a new connection, and GitLab still sends merge request events to the old Webhook URL. On the Webhook tab on GitLab's page, choose Add webhooks: it moves each webhook the connection's account can manage onto the new connection. For a project marked Add it by hand, give the connection's account the Maintainer role and choose Add webhooks again: a webhook added by hand doesn't update sessions.
Merge requests stopped updating sessions and releases
Only the webhooks Productmind adds, each with its own connection's secret, update sessions and releases. On the Webhook tab on each GitLab connection's page, choose Add webhooks once: webhooks set up before each connection had a secret of its own then get it. A webhook added by hand, and Bitbucket's pull requests, don't update sessions and releases: mark such a session completed from the session itself.
"This connection link has expired or was already used."
Too much time passed between choosing the tool's card and finishing in the tool, or the link was used once already. Connect the tool again from Integrations.
Only an owner can connect GitHub
Productmind shows "Only an owner of the GitHub organization, or the owner of the personal account, can connect it to Productmind." Ask an owner of the organization to connect GitHub. If your organization uses SAML single sign-on, the owner also needs an active single sign-on session in GitHub.
"This GitHub installation is already connected to another Productmind workspace."
A GitHub organization or account connects to one Productmind workspace at a time. Disconnect GitHub in the other workspace first, then connect it here. Because disconnecting uninstalls the Productmind GitHub App, an owner installs it again when you connect.
A Slack channel receives nothing
If the channel is private, invite Productmind to it. Check that the channel's switch is on, and that it is subscribed to the events you expect.
A session failed with "GitHub access for this workspace was removed"
The Productmind GitHub App is no longer installed on the GitHub organization or account your session's repositories belong to (or the session says it was suspended). The session shows Reconnect GitHub: reconnect GitHub (see To reconnect GitHub), then choose Retry on the session. If you don't see Reconnect GitHub, ask an Owner or Admin of your workspace to reconnect it.
An application can't reach its repository after a reconnect
Open the Git provider's page and choose Repair repository links. If Productmind still lists the repository as unreachable, the connection no longer has access to it. Give Productmind access to that repository in your Git provider.