

Tasks
Tasks are your engineering backlog: the concrete pieces of work that implement your product. Each task has a status, a priority and the people or teams assigned to it, and most tasks sit under the feature they help build. Any task can be handed to a coding session, which works on it in your repository and moves the task along as the work progresses.
Key concepts
Parent. A task can belong to a feature, an application or a session, or to nothing at all. The parent decides where the task appears in the list, and deleting the parent deletes its tasks.
Subtasks. Any task can sit under another task: it's then a subtask of that task, and subtasks can have subtasks of their own. Add one with the + on a task's row, or drag a task onto another task. See To add a subtask.
Type. A task's type is a label, Task or Subtask, that you can change at any time. It doesn't decide where a task sits: a task labelled Task can be a subtask, and moving a task under another one, or out from under it, keeps its type.
ID. Every task has an ID such as TASK-12, numbered within your workspace. You can search for it, and it identifies the task in coding sessions and pull requests. The PM agent knows it too: ask it about TASK-12, and it looks up that task.
Status. A task moves through six statuses. You can set any of them yourself, and coding sessions move tasks forward automatically. See How tasks behave.
| Status | Use it for |
|---|---|
| To Do | Work nobody has started. New tasks start here. |
| In Planning | Work being planned, for example by a coding session writing its plan. |
| In Progress | Work being done. |
| In Testing | Work being tested by hand. Productmind never sets this status on its own. |
| In Review | Work waiting for review, for example a pull request. |
| Done | Finished work. Hidden from the list by default. |
Priority. Low (the default), High or Critical.
Assignees. People, teams, or both. A task can have several assignees.
The Tasks page at a glance
In the sidebar, choose Tasks.
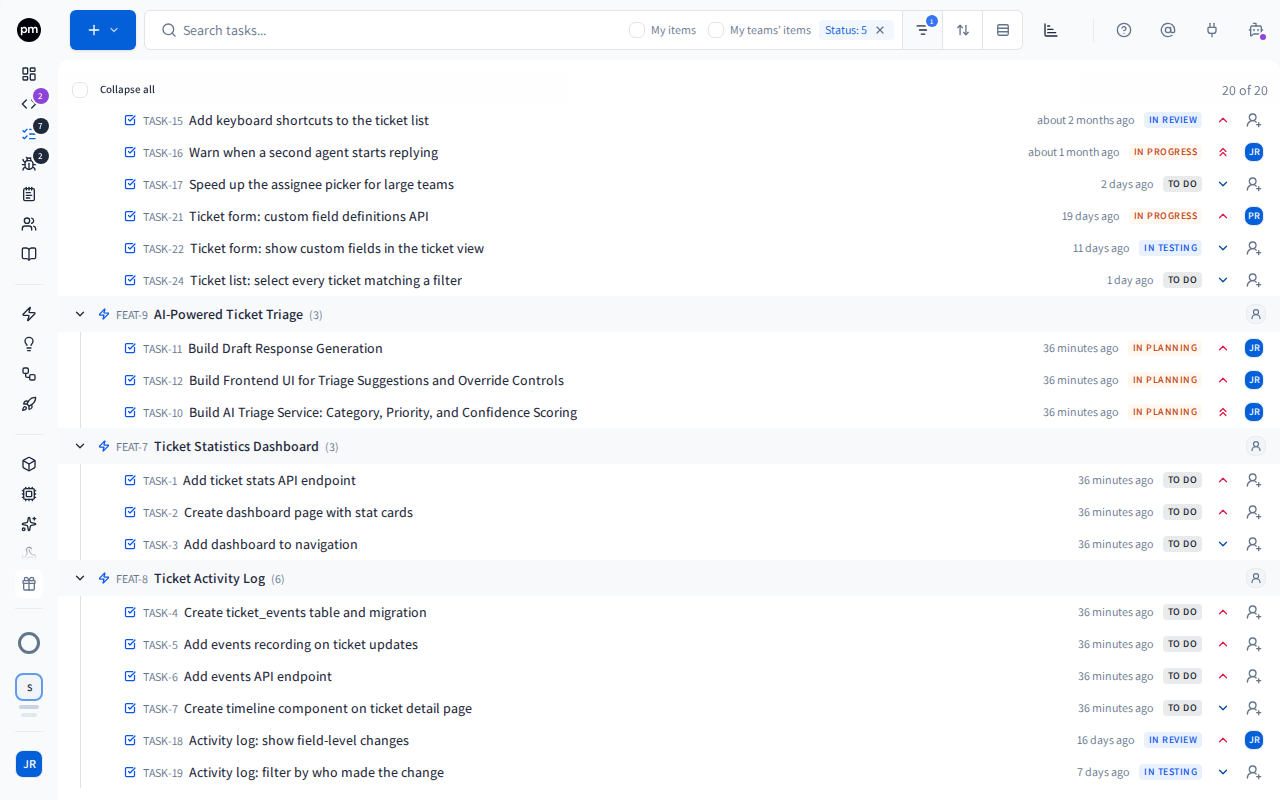
The toolbar holds, from left to right:
- Create (the + button), which adds tasks or imports them;
- the search box, which matches task titles and descriptions;
- chips for the filters, sort and grouping in use;
- Filters, Sort and Group by;
- Toggle timeline.
The list is grouped by parent:
- tasks with no parent come first;
- then one group per feature, in the order of your feature tree;
- then applications and sessions.
Each group header shows the parent's ID, which opens it in a new tab, and how many tasks it holds, such as 5 tasks. When you point at a header, Add task (the +) appears after the count, and on a feature also Generate tasks (the sparkles). A feature's header ends on its assignee, in line with the tasks' assignees.
Each row shows, from left to right:
- a dot, if the task changed since you last looked at this list;
- an arrow, if the task has subtasks: choose it to show or hide them;
- the type;
- the task's ID and title;
- its tags, in one chip: one tag shows its name, two or more read N tags. Choose it to add or remove tags without opening the task (see Tags). When the row is too narrow for them, they're hidden first, so the title stays whole;
- when it was last updated, such as 3h, 4d or Nov 7. Point at it to see the full date and time;
- its status, as an icon. Point at the row to see the status's name. See Status icons;
- its assignees;
- its priority.
Subtasks are listed under their task, indented, and a line runs down from each parent to its subtasks. When you scroll down a long list, the parent group and the task you're inside stay pinned at the top. On a focused row, the right and left arrow keys show and hide its subtasks. The list remembers which tasks you opened.
When you point at a row, Add subtask (the +) appears after the title, and Launch a coding session (the code icon) appears before the date. Once a task is in a coding session, that place shows the session's ID instead, such as SSID-12, all the time: choose it to open the session.
The counter above the list (for example 12 of 12) shows how many tasks are loaded out of how many match. More load as you scroll. If the task open beside the list doesn't match your filters, it stays in the list and the counter adds +1 open. It isn't counted.
Filtering, sorting and grouping
Filters, Sort and Group by open one panel with three columns.
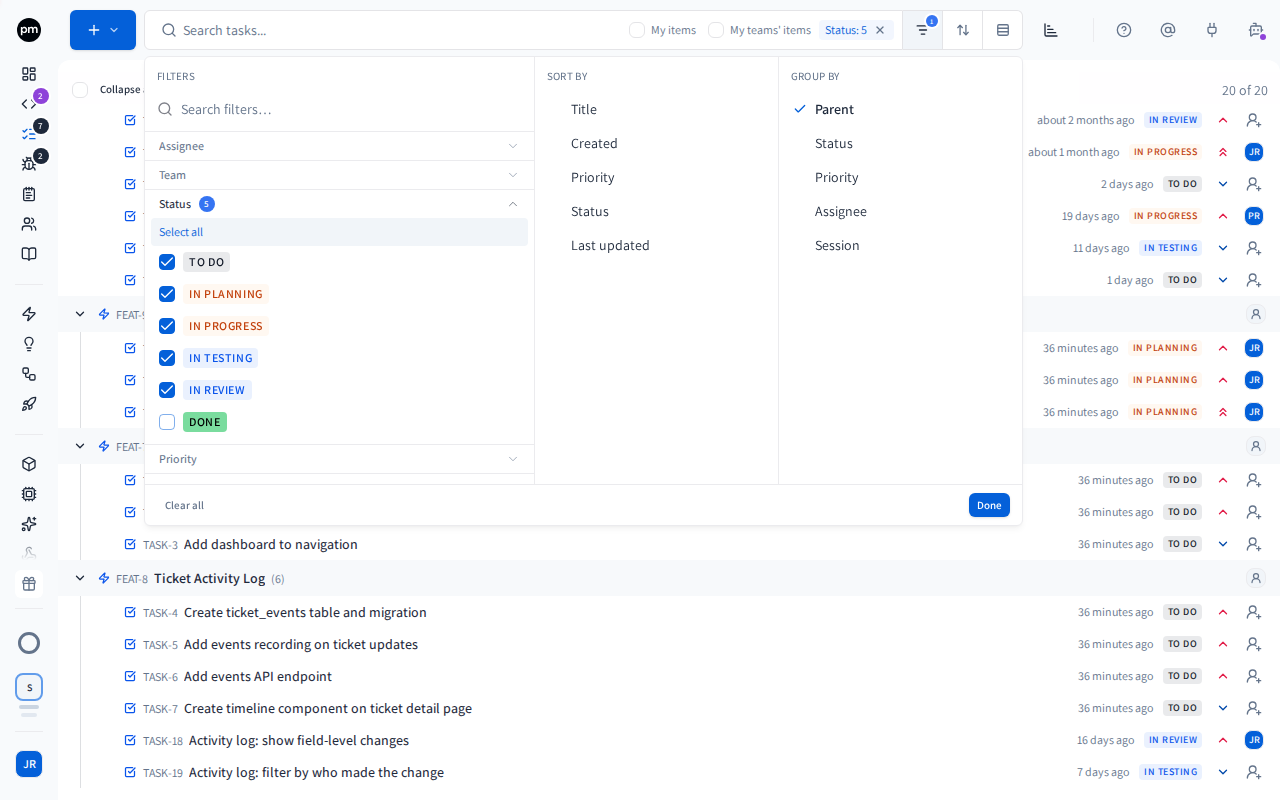
| Column | Options |
|---|---|
| Filters | Assignee (For me, a person, a team, or My teams), Team (a team, or My teams), Status, Priority, Parent type (Feature, Application, Session, No parent), and Tags |
| Sort by | Title, Created, Priority, Status or Last updated. Choose an option again to reverse the order, and a third time to remove it. |
| Group by | Parent (the default), Status, Priority, Assignee or Session |
By default the list hides Done tasks, which is why the search box shows the chip Status: 5. To see finished work, select Done in the panel, or choose the x on the chip to show every status.
Select several assignees to see the tasks of all of them.
For me, first in the Assignee filter, shows the tasks assigned to you and every task in your teams' areas: what Team shows for My teams, plus your own (see Filtering by team). The line under it reads "Assigned to me, or in my teams' areas", and the chip reads Assignee: For me. The Tasks count in the sidebar counts the open tasks it shows, and that count's View all opens the list on it. For me is on the Tasks page only, not on the dashboard's Tasks tab.
While no assignee is selected, the search box offers two checkboxes, My items and My teams' items. Select one to see only the tasks assigned to you, or to your teams. It turns into the chip Assignee: Me or Assignee: My teams. The checkboxes are hidden while any assignee is selected, from them or from Filters, and come back when you remove the chip. My teams' items appears only when your organization has teams. When the search box is too narrow for them, the checkboxes sit in the row of chips under the search box.
Productmind remembers your filters, search and grouping for this workspace in this browser.
A sort lasts until you leave the Tasks page or reload it, including while you open and close tasks. The list always opens grouped by parent, without a sort.
While you sort, each task gets its own row, subtasks included, with its parent shown next to its title. To get the tree back, choose the x on the Sorted chip, with Group by set to Parent.
Grouping by session
Choose Group by, then Session, to see which tasks are being worked on together in a coding session, and which aren't in any session yet.
A task appears once, under its current session. That is the first of these:
- the newest session working on it now;
- otherwise, the newest session still In Planning that includes it;
- otherwise, the newest finished session: Completed, Failed, Cancelled or Rolled Back.
Sessions working on their tasks come first, then sessions in planning, then finished ones, newest first in each. Tasks that were never in a session are under No session, at the bottom.
Each group header shows the session's ID, which opens the session in a new tab, its name, how many tasks it holds, and its status. The list keeps up with the sessions: when a session starts, changes status or is renamed, or a task is added to or removed from one, the task moves to its group without a reload. Sort orders the tasks inside each group, and every filter still applies.
Session is offered only if you can see coding sessions.
Filtering by team
Team shows a team's whole area: the tasks assigned to the team, the tasks of every feature in its area (a feature assigned to the team, and every feature under it, at any level), and all their subtasks. Select several teams, or My teams, to see all of their areas together. My teams' items shows only the tasks assigned to your teams themselves.
Team works with every other filter: add Status or Tags to narrow a team's area further. A task can show under a team while its assignee is someone else.
In the tree, a subtask shows under its task, so a subtask whose task isn't in the team's area doesn't appear there. Sort the list to see every task in the area on its own row.
To bookmark or share your teams' view, add ?team=my-teams to the list's address, for example
/tasks?team=my-teams. The dashboard's Tasks tab has no Team filter.
The timeline
Choose Toggle timeline to show your tasks on a calendar beside the list.
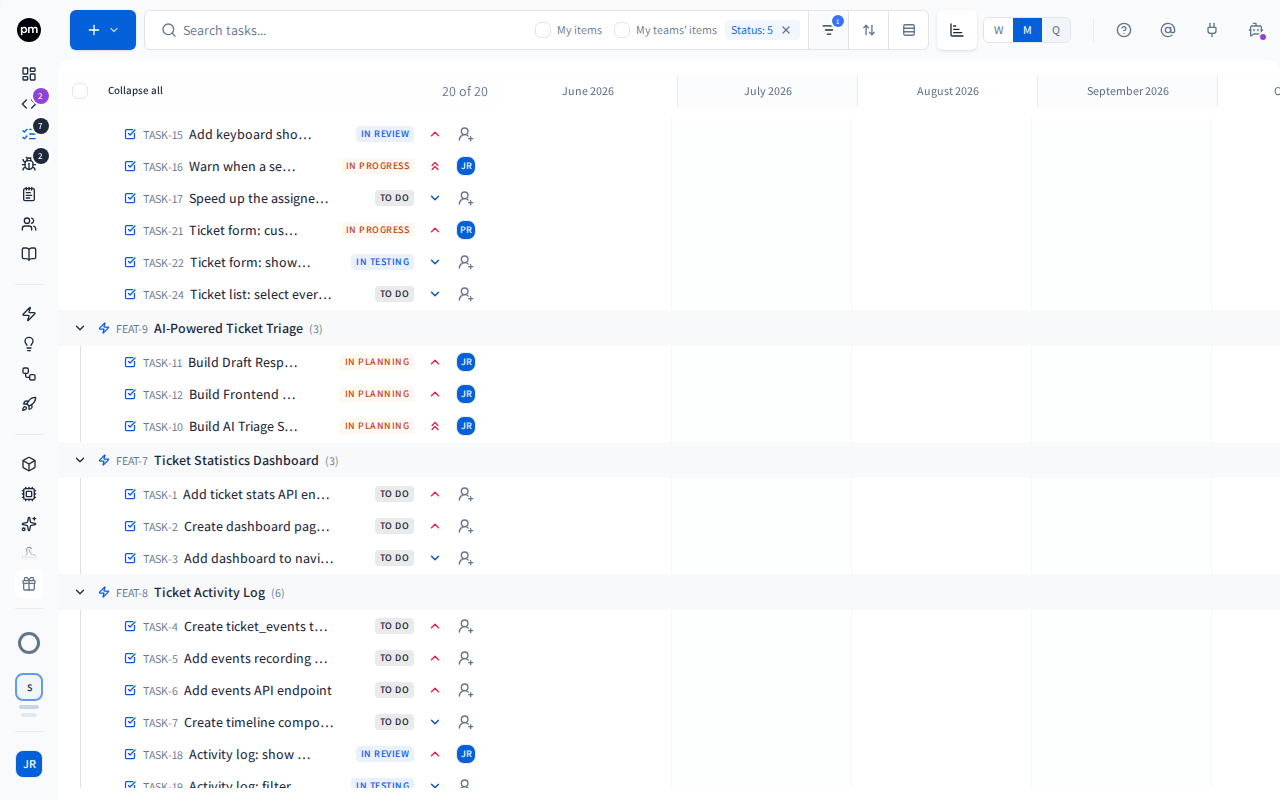
- W, M and Q zoom the timeline to weeks, months or quarters.
- A task's bar runs from its start date to its due date, colored by its status. A task with no dates has no bar. A task with only one date gets a one-day bar.
- Drag a bar to move both dates, or drag one end to change one date. Dragging never changes a task's status.
Productmind remembers whether the timeline is open.
Creating tasks
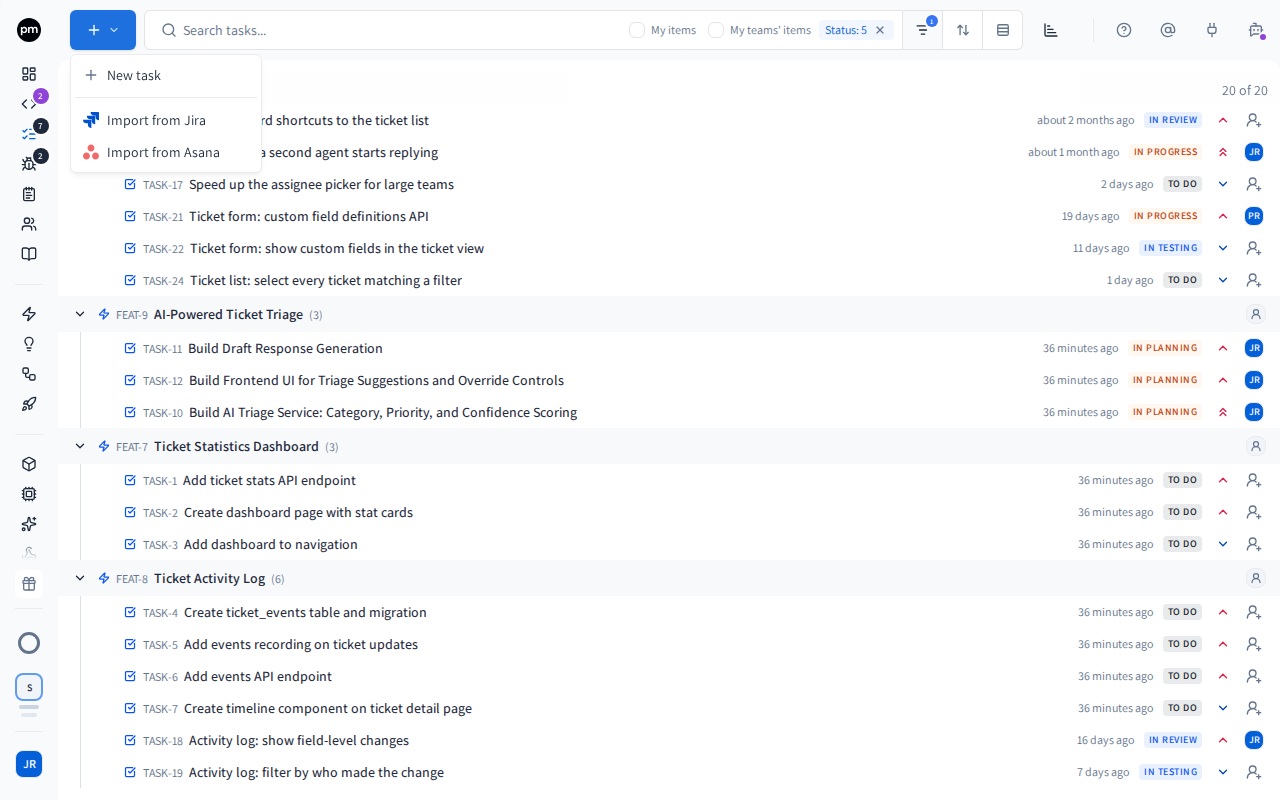
To create a task
- In the sidebar, choose Tasks.
- Choose Create (the + button), then New task.
- Enter a title, and press Enter.
The task appears at the top of the list, with the status To Do, the priority Low and no parent. The title field stays open so you can add the next one. Press Escape when you're done.
To add a task to a feature
- Point at the feature's group header.
- Choose Add task (the +).
- Enter a title, and press Enter.
The task is added at the bottom of that feature's group.
To add a subtask
- Point at the task's row.
- Choose Add subtask (the + after the title).
- Enter a title, and press Enter.
The task opens, and the subtask is added as its last subtask, under the same parent as the task. The title field stays open so you can add the next one. Press Escape when you're done.
Add subtask is hidden while you search, sort or group by anything but Parent.
To generate tasks for a feature
Productmind can read a feature and its context and suggest the tasks that would build it.
- Point at the feature's group header and choose Generate tasks. On the feature's own page, its Tasks tab offers Generate too.
- Wait while Productmind analyzes the feature. This can take a couple of minutes.
- Review the suggestions. You can change each one's type, priority and title, expand it to edit its tags and description, or remove it.
- Choose Create N tasks.
The tasks are created under the feature.
To generate tasks you need permission to update the feature (Features: Update) as well as to create tasks.
To import tasks from Jira
- Choose Create, then Import from Jira.
- Connect: connect your Jira account. If it's already connected, the wizard skips this step.
- Select Tasks: choose a Jira project, then select the issues to import.
- Map Fields: choose what each Jira issue type, status and priority becomes. By default:
- epics and stories become features, which start in the Backlog status;
- sub-tasks become subtasks, and every other issue type becomes a task;
- open issues become To Do, in-progress and blocked issues In Progress, and completed and cancelled issues Done;
- the lowest, low and medium priorities become Low, high becomes High, and highest becomes Critical.
- Map Users: match each Jira user to a member of your workspace, or choose Skip (unassigned).
- Import: check the summary, then choose Import N items.
The imported items keep a link to the Jira issue they came from. Imported tasks have no parent.
To import tasks from Asana
- Choose Create, then Import from Asana.
- Connect your Asana account, choose an Asana workspace and project, and select the tasks.
- Match Asana users to members of your workspace.
- Check the summary and start the import.
Completed Asana tasks become Done and all others To Do. Every imported task gets the priority Low.
You can also start either import from the Jira or Asana page under Integrations.
Other ways tasks are created
- From a feature request. Promote a request straight into the backlog. See Feature requests.
- From a bug report. Convert a report into a task. See Bug reports.
- From a note. Convert a note from the notes wall. See Notes.
Working with a task
Choose a task to open it beside the list.
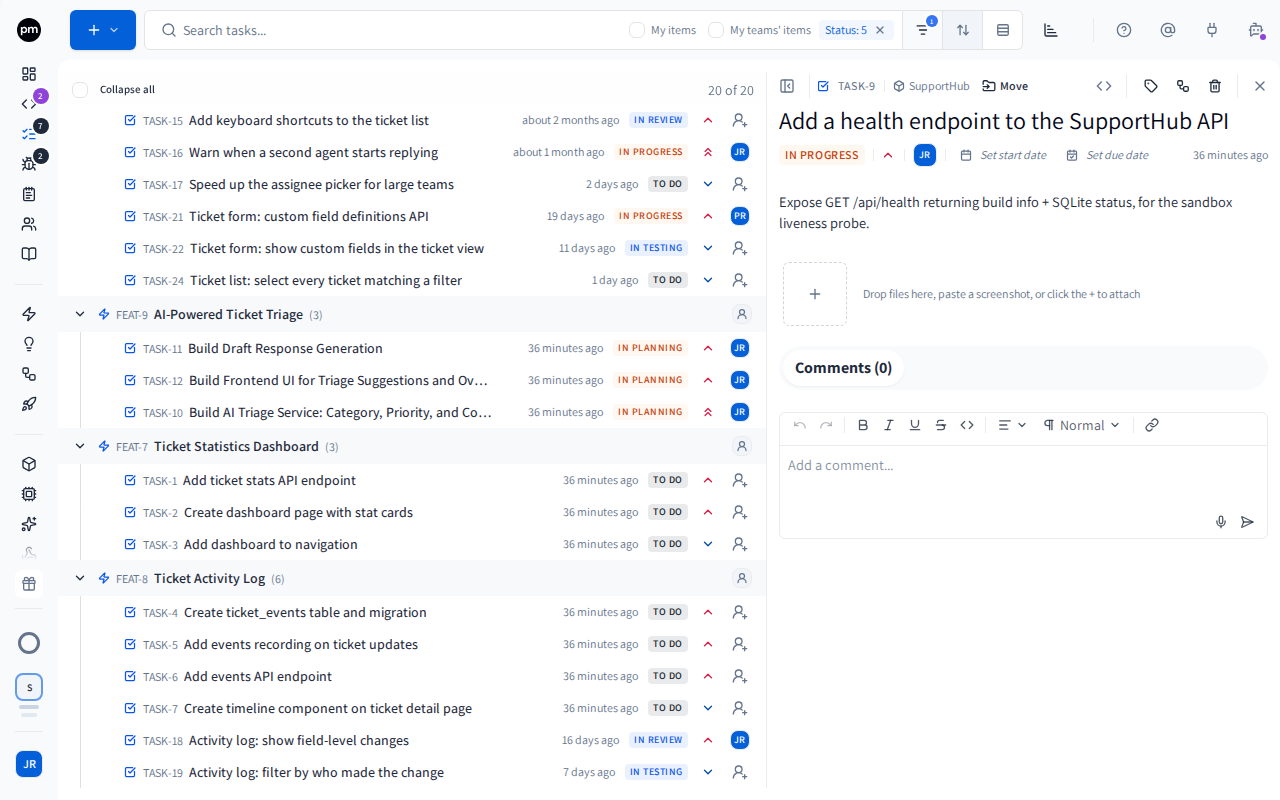
The header holds:
- the task's type and ID;
- its parent, with Move to change it;
- Launch a coding session, or a badge such as SSID-5 for each session the task is in, with Launch a coding session beside them once every one of those sessions has finished;
- Tags, Lineage and Delete task;
- Close.
Below the title are the task's status, priority, assignees, and Set start date and Set due date.
The body holds:
- the description, a rich-text editor where you can @mention people. While you edit it, an image you paste, drop or add with Insert image goes into the text where you put it; drag it to move it, and select it to resize or remove it;
- the attachments. Drop files, paste a screenshot, or choose +. An image you put in the description is listed here too;
- Comments.
Choose any of these to edit it in place. The title is editable too.
To change status, priority or assignees
Choose the status, priority or assignees on the task's row, or below its title, and pick the new value.
To change several tasks at once:
- Select them with the checkboxes that appear when you point at a row.
- In the bar that appears, choose Status, Priority or Move.
The bar also offers Launch a coding session and Delete selected.
Right-clicking a row opens the same actions, plus Open in new tab.
To assign a task
- Choose the task's assignees.
- Choose People or Teams, then select as many as you need. Unassign all clears them.
You're listed first under People, so you can assign yourself without searching.
Everyone you assign is notified. Assigning a team notifies each of its members. Nobody is notified when you assign yourself.
To move a task to another parent
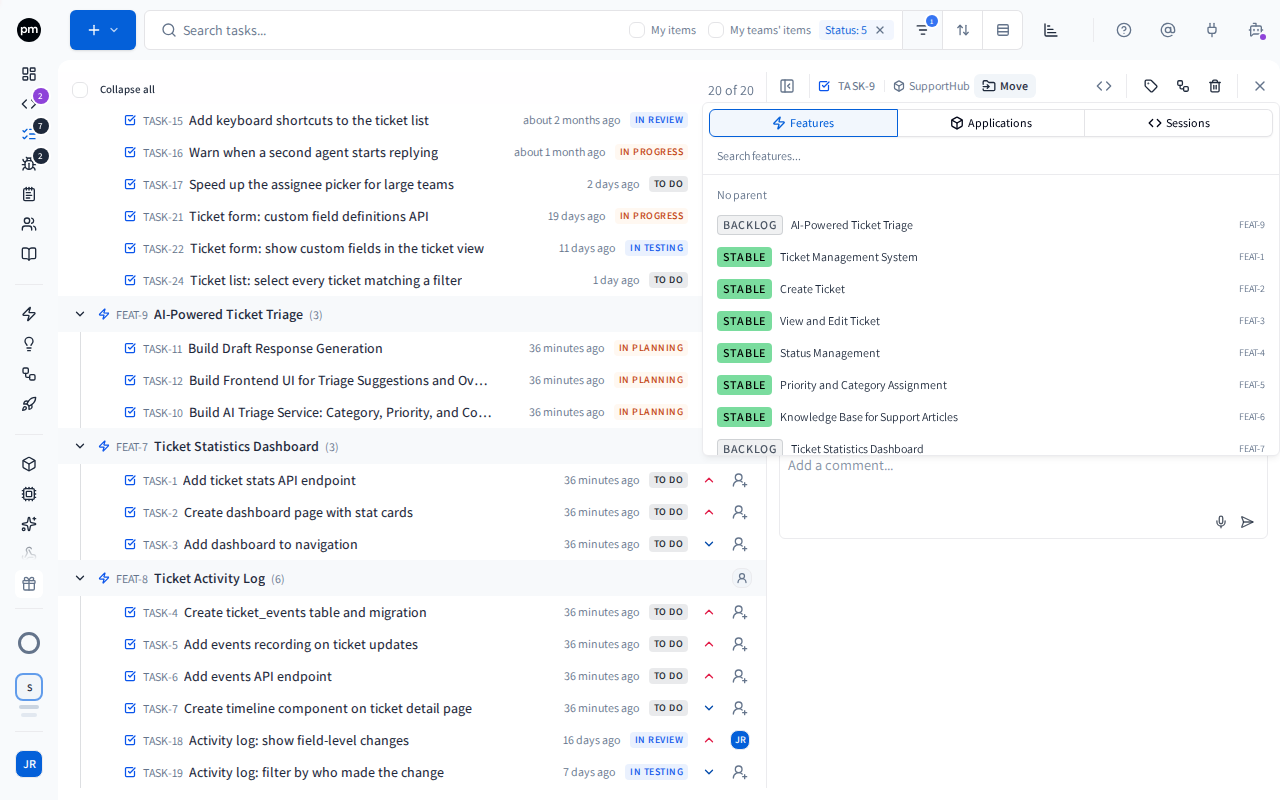
- Open the task and choose Move, next to its parent.
- Choose Features, Applications or Sessions, and search for the new parent.
- Choose the parent, or No parent to detach the task.
On Features you can also type a name that doesn't exist yet and choose Create to make a new feature and move the task into it.
In the list, you can also drag tasks while the list is grouped by Parent and not sorted:
- drag a task between rows to reorder it;
- drag it into another group to move it to that parent;
- drop it onto another task to make it a subtask;
- drag a subtask out between its group's tasks to make it a task of its own again.
You can't put a task under itself or under one of its own subtasks. On a feature's or a session's Tasks tab, a task stays in its group, and subtasks go one level deep.
Moving a task under an application or a feature also adds the repositories it now reaches to the task's sessions that are still In Planning and haven't chosen where they build.
To describe a task from screenshots
Attach one or more screenshots to a task, in the attachments or in the description, and Productmind reads them and drafts a description.
- If the description is empty, the draft is filled in for you.
- Otherwise a banner offers the draft. Choose Review changes to compare and apply it, or Dismiss to keep your own.
- If the screenshots don't show enough to describe the task, nothing is written. A note says why, what Productmind saw in them, and what to try next.
To ask again later, choose Describe from screenshots.
To launch a coding session
Choose Launch a coding session, from any of these:
- a task's row;
- its right-click menu;
- the task's header;
- the selection bar, to work on several tasks in one session.
The session opens and the task moves to In Progress. The agent starts once you draft the session's plan. See Starting a session.
To delete a task
- Open the task and choose Delete task, or right-click its row and choose Delete.
- Confirm.
Deleting a task also deletes its subtasks, comments and attachments, and removes it from any session. It can't be undone.
How tasks behave
Coding sessions move tasks forward. When a session works on a task, Productmind updates the task's status as the work progresses:
| When | The task becomes |
|---|---|
| A coding session is launched for it | In Progress |
| A session starts planning it | In Planning |
| It's added to a session whose agent is planning | In Planning |
| It's added to a session whose agent is building, or to a Live session | In Progress |
| A session opens a pull request for it | In Review |
| Every pull request for it is merged | Done |
| The change is deployed to production | Done |
These changes only move a task forward. A task that is already further along keeps its status. Adding a task to a session that hasn't started yet, or to a Code conversation, doesn't change it.
Removing a task from a session puts its status back. When you remove a task from a session whose agent has started, it goes back to the status it had before that session first moved it, for example from In Progress to To Do. It keeps its status when it's no longer In Planning, In Progress or In Review, for example once it's Done, or when another session that hasn't finished also holds it. Either way, the task's history notes the removal, and the agent is told to stop working on it. The work already on the session's branch stays. See Changing a session's scope.
Deleting a parent deletes its tasks. When you delete a feature, an application or a session, the tasks under it are deleted too. Move the tasks you want to keep first.
One session at a time. You can't launch a session for a task another session is still working on: the message names that session, and Open session takes you there. Once a session has finished (Completed, Rolled Back, Failed or Cancelled), the task can be launched again and the new session takes it on. Launching a task from your own session that is still In Planning, and hasn't chosen where it builds, replaces that session. Adding the task to another session asks first, with Move here, which takes it out of the session it was in.
Changes appear live. When a teammate or a session changes a task, the list and the open task update without a refresh.
New activity is marked. A dot before a row means the task changed since you last looked at this list. Point at the dot to see "New activity since your last visit" and when the task was updated. Your first visit shows no dots. Changes you make while you're on the page don't get a dot, and opening and closing a task doesn't clear the dots.
Opening Tasks reopens your last task. The Tasks page opens the task you last had open. Choose Close to see only the list.
Notifications. You're notified when you're assigned a task, or someone mentions you in its description or a comment. If your workspace posts events to a Slack channel, new tasks, changed tasks and assignments appear there. See Profile and notifications.
Permissions
| To | You need |
|---|---|
| See tasks | Tasks: Read |
| Create or import tasks | Tasks: Create |
| Generate tasks for a feature | Tasks: Create and Features: Update |
| Change a task (status, priority, assignees, dates, description, parent, order) | Tasks: Update |
| Delete tasks | Tasks: Delete |
| Launch a coding session | Sessions: Create |
| Group tasks by session | Sessions: Read |
The Owner, Admin, Power User, Developer and Product Manager roles can do all of these. Viewer and Customer can see tasks but not change them. See Roles and permissions.
Troubleshooting
A task I finished has disappeared
The list hides Done tasks by default. Open Filters and select Done, or remove the Status chip.
I can't drag tasks
Dragging works only while the list is grouped by Parent and not sorted, and only if you can change tasks (Tasks: Update). Remove the Sorted chip and choose Group by, then Parent. Reloading the page also removes the sort.
The Create button is missing
You need Tasks: Create. Ask an Owner or Admin of your organization.
A session won't launch for a task
Another session is still working on the task, and the message names it, for example "TASK-12 is already in SSID-4 (In Progress)". Choose Open session in the message, or the badge in the task's header, to continue there, or wait for that session to finish.
Generate tasks found nothing
Productmind shows "No tasks were generated" when it couldn't suggest any. Give the feature a fuller description and try again, or create the tasks yourself.