

Notes
Notes are the quickest way to write something down: a customer quote, a half-formed idea, a reminder, a defect you just spotted. They go on a wall shared by your workspace. When a note turns out to matter, you convert it into a feature request, a feature, a task or a bug report in a click or two, instead of copying it by hand.
Key concepts
Note. A title (optional), a body, and attachments. Images you drop into the body appear in it. Notes have no status, owner or ID: they get those when you convert them.
Pinned. Pinned notes are listed first, under Pinned.
Background color. A tint for the note's tile on the wall, and a colored dot on its row in the list. It isn't carried anywhere else.
Tags. Labels you add to a note, from the same set of tags as the rest of your workspace. They let you filter and group the list, and a converted note's item gets them too.
Grid and List. Two ways to show your notes. Grid is the wall of tiles. List shows one row per note, and opens the note you choose beside the list, so you can work through your notes one after another.
Convert. Turning a note into a backlog item. The note is then archived: a few seconds later it leaves the wall, and it points to the item it became.
The Notes page at a glance
In the sidebar, choose Notes.
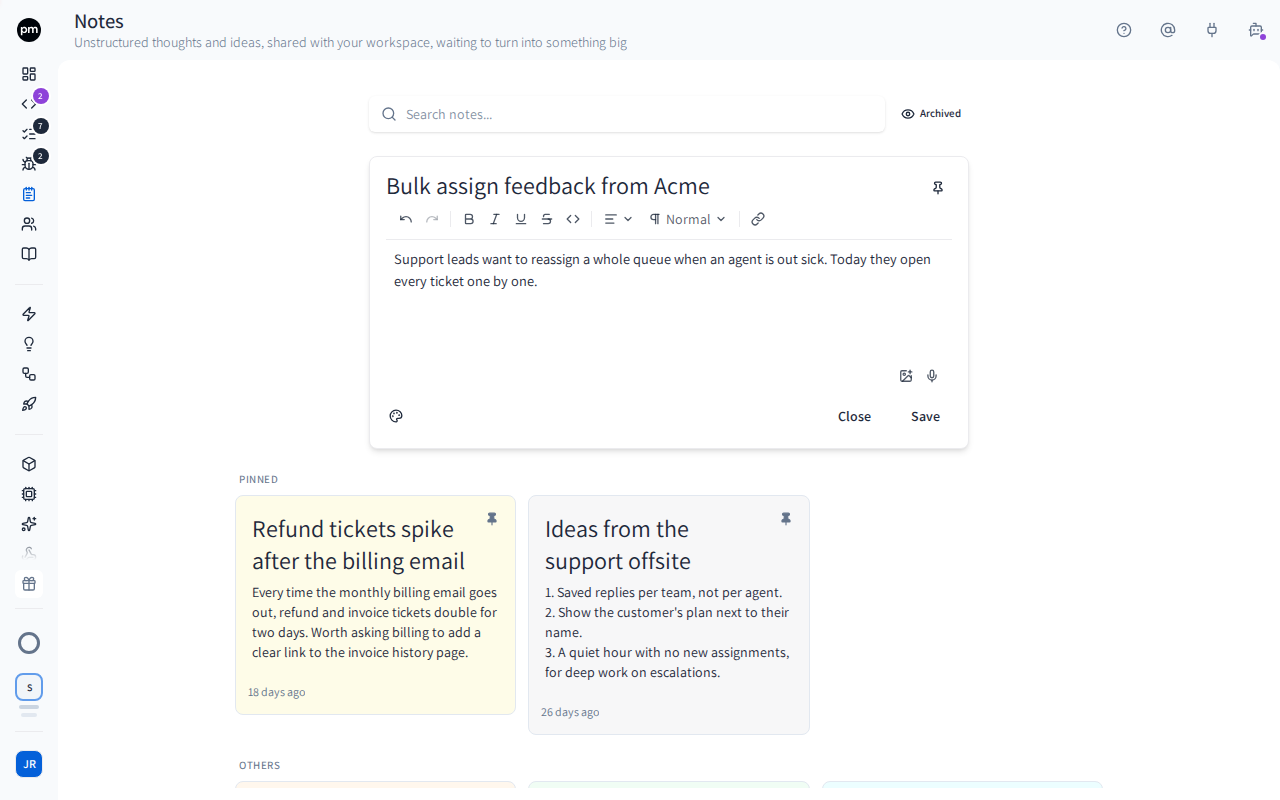
From top to bottom, the page holds:
- Search notes..., which filters the wall by title, text and contact as you type. It searches every note in the workspace, not only the ones on screen;
- Archived, which also shows the notes you converted;
- Grid view and List view, which switch between the wall and the list;
- Take a note..., where you write a new note;
- the wall: Pinned notes, then Others, newest first. More notes load as you scroll down.
Productmind remembers your search, whether Archived is on and which view you chose, for this workspace in this browser. The first time, you see the wall.
Each tile shows the note's first image, its title, the start of its text, and when it was last changed. A converted note also shows Promoted to, with the kind of item it became, its ID and its title: choose it to open that item. When you point at a tile, Delete, Pin and Convert to... appear.
The list
Choose List view to see your notes as a list. Your search and Archived stay as they were.
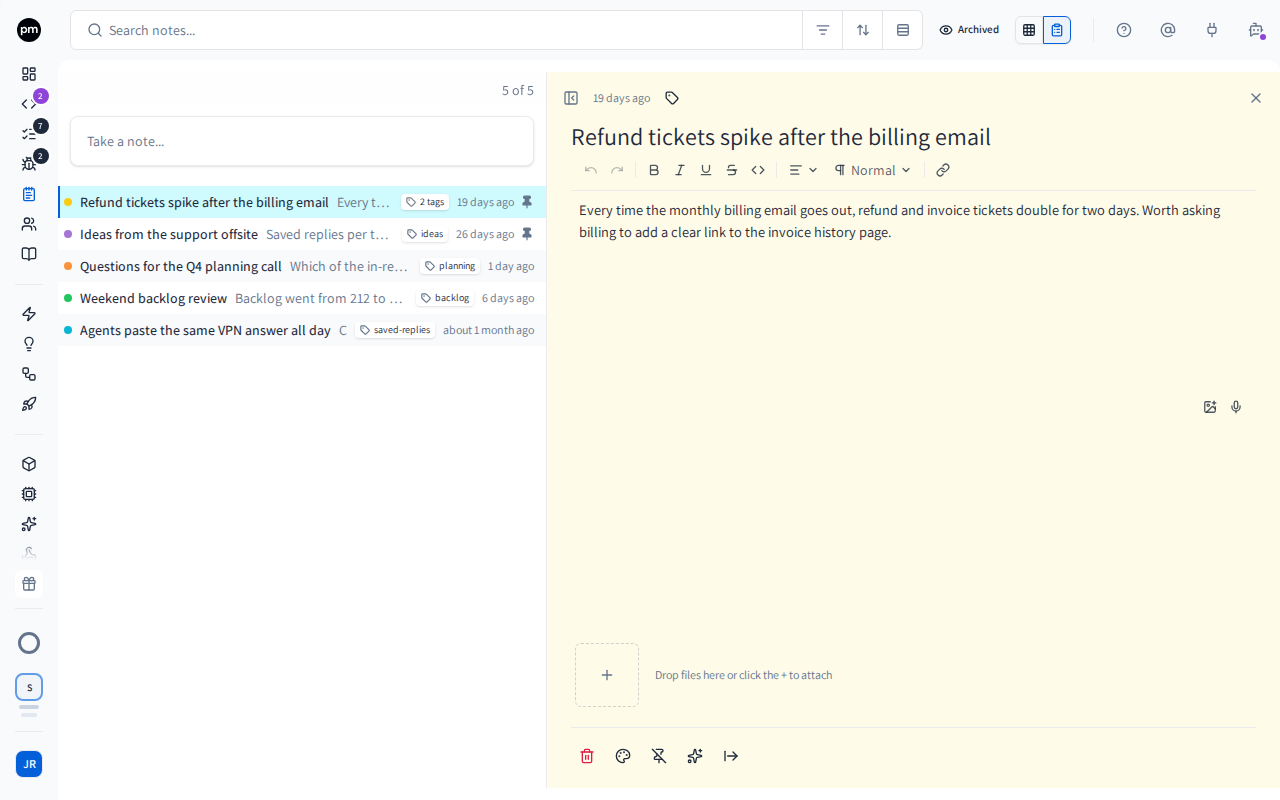
Each row shows, from left to right:
- a dot in the note's background color, if it has one;
- the note's title, or its first line if it has none, then the start of its text;
- its tags, in one chip you choose to add or remove tags (see Tags);
- the contact, if the note has one;
- when it was last edited;
- a pin, if it's pinned;
- once it's converted, an arrow and the ID of the item it became. Choose it to open that item.
On a narrow list, the start of the text, then the contact and then the date make room for the title.
The toolbar holds the search box, Archived, Grid view and List view, and one panel with:
| Filters | Tags: choose one or more tags to see the notes that carry any of them |
| Sort by | Last edited, Created or Title. Without a sort, pinned notes come first, then the newest. |
| Group by | Pinned, Contact, Color or Tag |
The sort, the grouping and the tags filter apply to the list only. The wall always shows Pinned, then Others.
A note with several tags appears under each of its tags. As more notes load, a tag's group can grow.
Take a note... sits above the rows.
To open a note in the list
- Choose the note's row.
The note opens beside the list, with everything the wall's note has: its title, text, attachments, AI summary, and Delete, Background color, Pin, Summarize with AI and Convert to.... Your changes are saved as you go.
Above the note are when it was last edited, Promoted to once it's converted, Tags, and Close. To give the note more room, choose Collapse list. You can also drag the edge between the list and the note.
To go back to the full list, choose Close, or choose the note's row again. To move on, choose another row: what you typed in the first note is saved.
When you come back to Notes in the list, the last note you had open opens again. The wall doesn't do that: it waits for you to choose a tile.
Right-click a row for Open in new tab, Pin, Convert to... and Delete.
Working with notes
To take a note
- In the sidebar, choose Notes.
- Choose Take a note....
- Optionally, enter a Title. Then write the note.
- Choose Save.
The note appears on the wall. Close saves it too, if you wrote anything.
While you write:
- drop an image, or choose Insert image, to put it in the text;
- drop another kind of file to attach it;
- in browsers that support it, choose Start dictation and speak: what you say is typed into the note;
- choose Background color or Pin.
To edit a note
- Choose the note's tile.
- Change the title or the text.
- Choose Close.
Your changes are saved as you go: there is no Save button.
To pin a note
- Point at the note's tile, or open the note.
- Choose Pin.
The note moves to the top of the wall, under Pinned. To put it back among the others, choose Unpin.
To tag a note
- Open the note, from its tile or its row.
- Choose Tags (the tag icon), next to when the note was last edited.
- Type a tag and press Enter, or pick one of your workspace's tags.
To remove a tag, choose the x on it. To let Productmind propose tags from the note's text, choose Suggest tags with AI, then accept or reject each suggestion.
The tags show on the note's row in the list. When you convert the note, the new item gets them.
To summarize a note with AI
- Open the note.
- Choose Summarize with AI (the sparkles).
Productmind reads the note and writes a summary. It appears under the note's text, in AI summary: an overview, then the key topics, action items and key statements. If the note has no title, the summary's title becomes the note's title.
The summary reflects the text as it was when you ran it: editing the note doesn't change it. To bring it up to date, choose Summarize with AI again. The new summary replaces the old one. The summary is also added to the item you convert the note into.
To convert a note
- Point at the tile, or open the note, and choose Convert to....
- Choose Feature Request, Feature, Task or Bug Report.
- For a task, choose the Feature it belongs to, or leave No feature. Then choose Convert to task.
The new item is created, and the note is archived. The note shows Promoted to and the item's ID, and the item shows Created from note.
The tile stays where it was for a few seconds, showing Promoted to and the new item: choose it to open the item. Then the tile leaves the wall. While you point at the tile, it stays.
| The new item gets | From the note |
|---|---|
| Its title | The note's title. Without one, the AI summary's title, or else the note's first line. |
| Its description | The note's text, unchanged. If the note has an AI summary, it is added underneath, under AI summary. |
| Its attachments | Copies of the note's attachments. The note keeps its own. |
| Its tags | The note's tags. |
Everything else starts empty or at its default: for example, a bug report starts with the severity Minor, and a feature starts in the Backlog status. A task belongs to the feature you chose, if any. Set the rest on the new item.
To find a converted note
- Choose Archived next to the search box.
Converted notes appear on the wall, each showing the item it became. Choose Archived again to hide them.
To delete a note
- Point at the tile and choose Delete, or choose Delete in the open note.
- Type
delete, and choose Delete.
Deleting a note deletes its attachments too. It can't be undone.
How notes behave
Notes are shared. Everyone in the workspace who can see notes sees the same wall. Pins and background colors are shared too: pinning a note pins it for everyone.
A note converts once. A converted note no longer offers Convert to.... To track more than one thing, write one note per thing.
A feature request from a note has no customer interest. A note isn't customer demand, so the request starts with no interested customers. If your workspace asks for evidence before a request becomes a feature, add it on the request first. See Feature requests.
Permissions
| To | You need |
|---|---|
| See notes | Notes: Read |
| Take notes | Notes: Create |
| Edit, pin, color and summarize notes | Notes: Update |
| Convert a note | Notes: Update, and permission to create that kind of item, such as Tasks: Create |
| Choose a task's feature when converting | Features: Read |
| Delete notes | Notes: Delete |
| Add and remove tags | Tags: Create and Tags: Delete |
The Owner, Admin, Power User, Developer and Product Manager roles can do all of these. Viewer and Customer can see notes but not change them. See Roles and permissions.
Without Notes: Create, Take a note... doesn't appear on the page. Without Notes: Update, a note opens read-only: you can read its title, text, tags and AI summary, but not change them. Without Features: Read, converting to a task doesn't ask for a feature: the task has none.
Troubleshooting
A note I converted has disappeared
Converting archives the note, and its tile leaves the wall a few seconds later. Choose Archived to see it, or open the item it became: its Created from note link leads back to the note.
Convert to... is missing, or offers fewer items
The note is already converted, or you can't create that kind of item. Each item appears only if you may create it.
Summarize with AI is grayed out
The note has no text yet. Write something first.
The list doesn't open the note I had open
Only the list reopens the last note. If you were on the wall, choose List view first. If the note was deleted or converted to another workspace's item, the list opens without it.